Koda Free Fire: Complete Aurora Vision Guide — Abilities, Best Combos & Honest Verdict 2026
There’s one reason Koda players keep saying the skill “doesn’t work” in ranked matches — and it’s not the skill. It’s a misunderstanding of how Aurora Vision actually fires. Most players expect continuous scanning for 10 full seconds. What they get instead is 5 detection pulses with a 1-second gap between each one. The enemy moves in that gap. The Koda player loses the target. They think the skill bugged.
It didn’t bug. But nobody explains the pulse mechanic correctly.
Koda launched with the OB47 update on December 4, 2024 — a 17-year-old Arctic explorer whose technologically advanced mask gives him the ability to see through walls. His Aurora Vision is one of the most misunderstood skills in Free Fire, partly because of how it fires, and partly because of a cooldown discrepancy across guides that still hasn’t been resolved on most sites.
This is the guide that settles everything — the exact numbers from official sources, the real scanning mechanic, the counters, and where Koda fits in the meta today.
Who Is Koda? Lore, Background and Why It Matters for Gameplay
Koda is a 17-year-old from an Arctic village. While exploring outside his ancestral home, a snow fox led him to a technologically advanced mask that belonged to his ancestors. The mask gave him the ability to sense and track what others cannot see. He loves MMORPG games, which directly shapes his character identity — Koda plays Free Fire the way an MMORPG scout plays his role: gathering information so the rest of the team can make better decisions.
This lore context matters for a practical reason. Koda is not a combat character at heart. He’s a reconnaissance character dressed in an active-skill format. Players who pick him expecting direct combat output like Oscar’s knockback or Jota’s healing will be disappointed. Players who pick him to turn information into advantages will find him one of the strongest support-aggressive characters in the game.
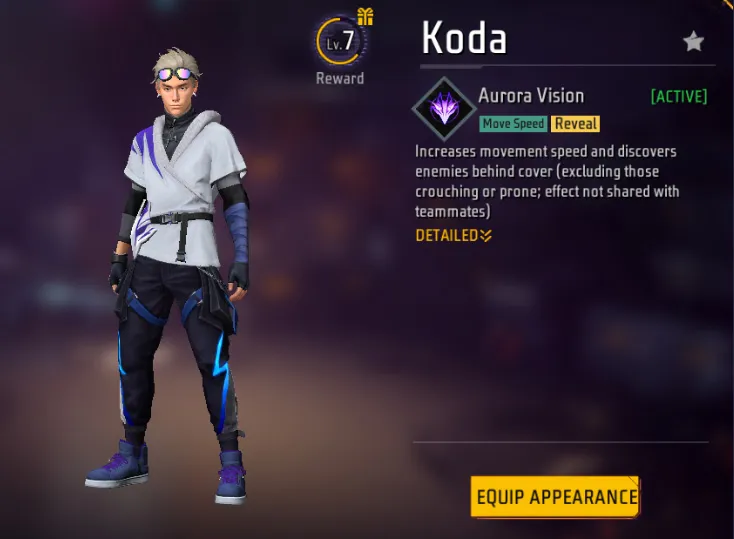
He’s officially classified as an active-hybrid character because Aurora Vision has both an active component (the enemy detection scan) and a permanent passive component (the freefall enemy highlight). Both parts are always available — one activates on command, the other fires automatically every time you drop from the plane.
Aurora Vision — All Three Mechanics Explained Properly
This is where every other guide gets incomplete. Koda’s Aurora Vision isn’t one ability — it has three distinct mechanics that operate differently. Understanding all three is the difference between using Koda well and wasting a 60-second cooldown.
Mechanic 1 — The Active Scan (Aurora Vision)
When you press Koda’s skill button, Aurora Vision activates for 10 seconds. During those 10 seconds:
- Koda gains a 10% movement speed boost for the full duration
- Every 1 second, the skill pulses and detects enemies within 50 meters in front of Koda
- Detected enemies appear as blinking holograms in Koda’s view
- The hologram blinks once, then disappears for 1 second before the next pulse fires
Here’s the critical part nobody explains: the detection fires every 1 second with a 1-second gap between each pulse. In a 10-second window, you get approximately 5 detection moments, not 10 and not continuous. Between pulses, enemy holograms are invisible — they’ve blinked once and gone dark until the next pulse.
This is why Koda players lose track of enemies mid-skill. An enemy that was standing at 30 metres when the first pulse fired has moved 10–15 metres by the next pulse. If they stepped behind a wall during that gap, the second pulse won’t show them because they’re now facing a different direction.
The practical lesson: when Aurora Vision shows an enemy’s hologram, act on that information immediately. You have roughly 1 second before the hologram disappears. Use the detection moment to pre-aim, reposition, or communicate the location to your squad. Don’t wait for “continuous” tracking — it doesn’t exist.


Free Fire Quiz
Free Fire Quiz: How Well Do You Really Know the Game?

Free Fire Redeem Code Today
30 active codes updated automatically — copy and redeem before they expire.
Cooldown: 60 seconds. Some sources incorrectly list 45 seconds. The official Garena OB47 patch notes at ff.garena.com confirm the cooldown is 60 seconds. Verify in-game if you’re unsure after any future patches.
Mechanic 2 — The Detection Limitation
Aurora Vision cannot detect enemies who are:
- Crouching (ads crouched or moving crouched)
- Prone (lying flat on the ground)
- Behind Koda (the scan is directional — 50m in front only, not 360 degrees)
- Beyond 50 metres in any direction
This is a deliberate balance decision from Garena — the skill has real counterplay. An experienced enemy who knows a Koda is nearby will crouch or go prone to break line-of-detection. A seasoned squad can completely deny Koda’s intel by having their entry fraggers go prone behind cover before Koda activates.
The directional limitation is the trickiest in practice. If you activate Aurora Vision while facing north and an enemy is approaching from the east, they won’t appear. This means you need to have a read on the likely enemy direction before activating — not after. Players who panic-activate Aurora Vision when they’re being shot at often gain zero information because they’re looking away from their attacker.
Pro Tip: Never activate Aurora Vision reactively when you’re already taking fire. Activate it proactively — 3 to 5 seconds before you enter a building, push a position, or move through an open zone rotation. The skill is a setup tool, not a panic button.
Mechanic 3 — The Freefall Passive (Scan and Mark)
This third mechanic is always active — no button press required. While parachuting after jumping from the plane, Koda automatically highlights enemy positions within his field of view.
Two key details that guides consistently miss:
- This effect is personal only. It does not share enemy locations with teammates. Your squad cannot see the highlights.
- It only shows enemies within your visible range. If you’re looking one direction while descending, enemies behind you are not highlighted.
Despite the limitations, this passive makes Koda uniquely valuable in drop phase. Hot drops in Pochinok, Peak, or Mill become significantly less dangerous when you know exactly how many enemies are landing at the same compound. You can redirect mid-air, land at the edge rather than the centre, or commit knowing the exact enemy count before you touch the ground.
In squad play, Koda should call out what he sees during the drop even though his teammates can’t see the highlights. “Three enemies landing at the warehouse” from a Koda player in voice chat changes the whole squad’s landing decision in real time.
Aurora Vision — Complete Stats Reference
| Stat | Value |
|---|---|
| Skill Type | Active (manual trigger) + Passive (freefall) |
| Active Duration | 10 seconds |
| Detection Pulses | ~5 (fires every 1s, with 1s gap between) |
| Detection Range | 50 metres (directional — front only) |
| Detection Limitation | Cannot detect crouching or prone enemies |
| Movement Speed Boost | +10% for 10 seconds |
| Cooldown | 60 seconds (official OB47 patch notes) |
| Freefall Passive | Highlights visible enemies during descent |
| Freefall Sharing | Personal only — not shared with teammates |
Koda vs Clu vs Moco — Which Intel Character Should You Run?
Koda isn’t the only character who gives enemy location information. Clu and Moco both provide intel in different ways, and the choice between them matters for your playstyle.
| Feature | Koda | Clu | Moco |
|---|---|---|---|
| Trigger | Active (manual) | Active (manual) | Passive (auto-on-hit) |
| Range | 50m directional | ~50m radius | Triggered by damage |
| Can Find Campers | Yes (if in front) | Yes | Only after you shoot them |
| Works Through Walls | Yes | Yes | No — requires line of sight |
| Works on Prone Enemies | No | Yes | Yes |
| Shares with Team | No | Yes (if nearby) | Yes |
| Movement Bonus | Yes (+10%) | No | No |
The clearest takeaway from this comparison: Koda finds enemies you haven’t engaged yet, through walls, in front of you. Moco marks enemies you’ve already hit. Clu is closest to Koda but can detect prone/crouching enemies and shares information with nearby teammates.
Koda wins when: you’re pushing unknown positions, entering buildings blind, or rotating through the mid-game where you need pre-engagement intel before the fight starts.
Moco wins when: you’re already in a fight and need to track enemies you’ve damaged. The passive trigger is more reliable in close-range ranked exchanges where you’re constantly shooting.
Clu wins when: your squad relies on shared information and you’re playing coordinated team play at mid-to-high rank. Clu’s team-sharing makes her Koda’s direct upgrade for squads — but only if you’re actually coordinating.
Common Mistake: Players replace their Alok or K with Koda thinking they’re adding an “intel layer.” Koda works best as a secondary skill slot addition, not as a replacement for sustain. The 10% speed boost during Aurora Vision only lasts 10 seconds — it doesn’t replace Alok’s healing aura for rotations.
3 Best Koda Combos in 2026
Combo 1 — The Squad Recon Build (Best for Squad BR)
Koda + Alok + Jota + Moco
This is the meta squad build for players who want to lead pushes with information. Koda activates Aurora Vision before entering a compound or pushing a building — he sees enemy positions through walls, confirms count and location to his team, then the squad enters. Alok’s healing aura keeps everyone alive during the push. Jota provides HP recovery after close-range kills. Moco marks the first enemy hit, keeping their position tracked even after they break Koda’s directional detection window.
The synergy between Koda and Moco here is specific: Koda finds the enemy before the fight. Moco tracks them during the fight. Together they provide pre-engagement and mid-engagement intel with no overlap. Alok and Jota handle the sustain so the Koda player isn’t sacrificing healing for information.
Combo 2 — The Early Landing Dominator (Hot Drop BR)
Koda + Kelly + Jota + D-Bee
This is built entirely around Koda’s freefall passive. In hot drop zones where squads are landing on top of each other, Koda’s parachuting enemy highlight gives you a genuine positional advantage before anyone touches the ground. You know exactly where to land and how many enemies are there. Kelly boosts sprint speed for the first critical 3 seconds of landing — when you’re scrambling for a weapon and the closest enemy is 10 metres away. D-Bee increases accuracy and movement speed while firing, which matters enormously in hot drop gunfights where movement is chaotic. Jota provides sustain after the first knockdown.
This combo is unusually strong in India and Southeast Asia servers where hot dropping Pochinok, Peak, and Mill happens in nearly every squad game. Koda’s parachute intel + Kelly’s ground speed + D-Bee’s shooting mobility makes the first 60 seconds of a match far more controlled than it looks from the outside.
Free Fire Player Info Tool
Free Fire Player Info Tool – Check Complete Player Stats Using UID Free Fire is one of the…

Free Fire Id Check
Free Fire ID Check: The Ultimate Player Scout & Verification Tool In the competitive world of Garena Free…
Combo 3 — The Solo Ranked Intel Build
Koda + Alok + Shirou + Laura
Solo ranked in Free Fire is fundamentally an information game. Most deaths in Diamond and above aren’t from losing gunfights — they’re from walking into ambushes you didn’t know were waiting. Koda’s Aurora Vision before pushing any building removes that risk. Shirou marks the first enemy to shoot you and gives you 35% armor penetration on your first return shot — punishing anyone who tries to ambush Koda specifically. Laura boosts ADS accuracy, making the first shot after a Koda detection moment more reliable. Alok covers sustain.
The practical flow: rotate carefully, activate Aurora Vision before every building entry or compound push, and let Shirou punish anyone who gets the drop on you. Laura ensures that when you ADS on a detected enemy hologram, your first shot lands.
This build has a genuine weakness in fully open-field late circles where there’s no structure to push through and Koda’s directional limitation leaves blind spots. In those situations, pop Alok immediately and fall back on raw shooting skill.
What Aurora Vision Does NOT Do — The Honest Limitations
Most guides gloss over these. They matter enough to list clearly.
It doesn’t work on crouching or prone enemies. An experienced camper in a corner who goes prone the moment they hear you activate the skill becomes completely invisible to Aurora Vision. This is the most commonly exploited counter at high ranks.
It doesn’t give your squad real-time tracking. Unlike Otho’s post-knockdown reveal, Koda’s intel is personal. Your teammates need to be on voice chat or text chat for this information to become a squad asset. In random squads with no communication, Koda’s value drops significantly.
It doesn’t work through 360 degrees. Activating while an enemy flanks you from behind does nothing. You need to face the threat before activating.
The 60-second cooldown means you get roughly 5 activations per match. Choose your 5 moments carefully. In a 25-minute BR game, 5 activations that each last 10 seconds is not a lot of coverage. Save the skill for compound entries, building clears, and final circle rotations — not for open-field movement where visual tracking does the same job.
How to Counter Koda
If you’re facing a Koda and consistently getting caught, the counters are straightforward.
Go prone or crouch when you hear an enemy activate a skill near your position. Koda’s Aurora Vision is completely nullified by prone positioning. You become invisible to the scan. Stay still in prone for 15 seconds and the window closes entirely.
Stay behind Koda, not in front. Aurora Vision is directional. If you can identify a Koda player and stay outside his forward 50-metre cone, he gets nothing from activating the skill. Flanking from behind is the mechanical counter to directional detection.
Use the pulse gap. Because the detection fires every 1 second with a 1-second gap, you have a 1-second window to reposition between each pulse. Experienced players can move between cover during the gap and break Koda’s line of detection mid-activation.
How to Unlock Koda in Free Fire
Koda launched with a free unlock path during the Winterland Aurora event (December 2024–January 8, 2025). Players who completed daily missions earned him permanently at zero cost. If you missed that window:
- Character store — direct diamond purchase (most reliable)
- Lucky draw or event bundles — check the Events tab during active rotations
- Character fragments — collected from Luck Royale over time
Check the Free Fire daily redeem codes page — active codes sometimes include diamonds or trial tokens. For the fastest diamond-free path, see how to get free diamonds in Free Fire — several consistent methods apply here.
Is Koda Worth Using in Ranked Right Now?
Yes — specifically for players with squad voice communication and a patient playstyle.
The honest limitation is that Koda’s Aurora Vision is information-based, and information only converts to wins when it changes behaviour. In a random squad where nobody acts on your “enemy behind that wall” callout, Koda’s skill is effectively unused. In a coordinated squad or duo where your partner adjusts based on your detection, every activation creates a genuine advantage over the enemy.
For solo ranked, Koda is still viable — the movement speed boost and pre-engagement intel reduce ambush deaths significantly. He won’t carry you through a firefight the way Alok or K can. But every time you enter a building knowing exactly where the enemy is standing, you’re winning an exchange you would otherwise lose 50/50.
For more on how Koda compares to every other character in the current meta, see the Free Fire complete character guide for 2026 on FreeFireNation. And if you’re building a combo around information gathering, the solo rank push tips guide covers exactly how to convert intel advantages into rank points.
FAQ
What is Koda’s ability in Free Fire?
Koda’s ability is called Aurora Vision. It’s an active-hybrid skill — when activated manually, it scans enemies within 50 metres (front only) every 1 second for 10 seconds, while also boosting movement speed by 10%. A passive component automatically highlights visible enemy positions during the freefall drop phase. Cooldown is 60 seconds as confirmed in the official Garena OB47 patch notes.
How long does Aurora Vision scan for in Free Fire?
Aurora Vision is active for 10 seconds, but the detection doesn’t fire continuously. It pulses once every second with a 1-second gap between each detection moment — so you get approximately 5 actual enemy reveals across the full activation window. Enemies that move between pulses may not be detected on the next pulse if they’ve changed position or gone prone.
Can Koda detect crouching enemies with Aurora Vision?
No. Aurora Vision cannot detect enemies who are crouching or prone. This is a deliberate game balance limit. Experienced players who know a Koda is nearby will go prone or crouch to break detection entirely. Always do a secondary visual check after Aurora Vision ends — hidden enemies may still be present.
Is Koda’s Aurora Vision cooldown 45 or 60 seconds?
The official Garena OB47 patch notes confirm the cooldown is 60 seconds. Some third-party sites listed 45 seconds based on advance server or pre-release data. Always verify in-game after a major patch, but as of April 2026, the official confirmed cooldown is 60 seconds.
Is Koda better than Clu or Moco in Free Fire?
It depends on your role. Koda finds enemies before engagement through walls and gives a movement speed boost — ideal for pre-entry scouting. Clu detects enemies in a radius, including prone ones, and shares information with nearby teammates, making her better for coordinated squads. Moco passively marks enemies you damage in a fight, making her stronger in reactive close-range situations. Koda is the best choice for solo scouting; Clu is better for coordinated team play.
Read Next
- All Free Fire Characters — Complete 2026 Guide
- Solo Rank Push Tips That Actually Work in Ranked
- Free Fire Daily Redeem Codes — Updated Today
- Best Headshot Sensitivity Settings in Free Fire
Internal Links Used:
- “Free Fire daily redeem codes” → https://freefirenation.com/free-fire-redeem-code-today/
- “how to get free diamonds in Free Fire” → https://freefirenation.com/how-to-get-free-diamonds-in-free-fire/
- “Free Fire complete character guide for 2026” → https://freefirenation.com/ff-character-in-2026/
- “solo rank push tips guide” → https://freefirenation.com/solo-rank-push-tips-free-fire/
- Read Next: All FF Characters → https://freefirenation.com/ff-character-in-2026/
- Read Next: Solo Rank Push → https://freefirenation.com/solo-rank-push-tips-free-fire/
- Read Next: Redeem Codes → https://freefirenation.com/free-fire-redeem-code-today/
- Read Next: Headshot Settings → https://freefirenation.com/best-headshot-sensitivity-settings-in-free-fire-2026/
External Links to Add (open in new tab):
- Official Garena OB47 Patch Notes (Koda launch) → https://ff.garena.com/en-pk/article/1421/
- Liquipedia Free Fire character database → https://liquipedia.net/freefire/

Written by
Free Fire Nation Team
Free Fire Nation is a dedicated gaming editorial team covering Free Fire news, weapon guides, esports, and redeem codes since 2019. All content is tested in-game and verified against official Garena sources.