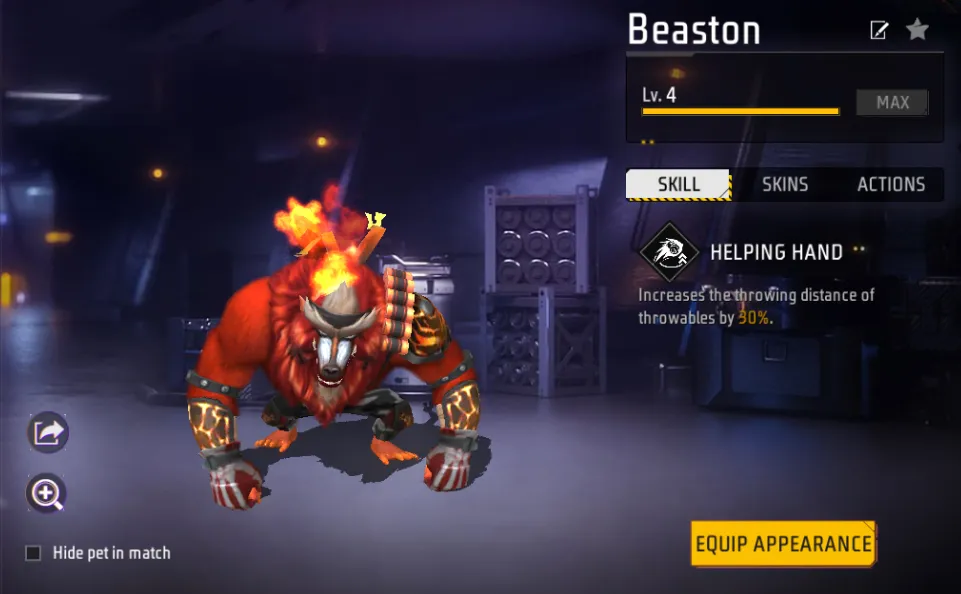
Free Fire Beaston Pet
The grenadier’s best friend. Beaston’s Helping Hand ability increases throwing distance of grenades, Gloo Walls, flashbangs, and smoke grenades by 30% — turning every throwable into a long-range tactical weapon that reaches spots enemies think are safe.
Pet Tier
Throw Range (Max)
Ability
Diamonds
Max Level
Why Beaston Is the Clash Squad King
Most Free Fire pets give you something passive — a heal on kill, a cooldown reduction, a Gloo Wall that appears in your inventory. Beaston does something different: he makes every throwable in the game reach 30% further. That sounds simple. In practice, it rewrites how throwable combat works entirely.
With Beaston at max level, a grenade that normally lands 15 meters away now lands at 19.5 meters. A Gloo Wall that maxes out at 20 meters of throw distance now reaches 26 meters. A flashbang that barely clears a window now sails into the back of a room. A smoke grenade that falls short of your teammate’s position now lands exactly where they need cover. Every throwable in your inventory becomes a mid-range tactical tool instead of a close-range utility.
This is why Beaston dominates Clash Squad. In a mode where grenades decide rounds, where a well-placed flashbang wins a 1v3, and where Gloo Wall placement angles determine who holds a position — Beaston’s +30% throw range creates options that non-Beaston players simply can’t replicate. You throw grenades into spots they didn’t think were reachable. You place Gloo Walls at angles they can’t match. You flashbang rooms from distances they thought were safe.

In the 2026 meta, Beaston sits in A-Tier — not S-Tier because his value depends entirely on your utility usage. If you don’t throw grenades, flashbangs, or smoke grenades frequently, Beaston is wasted. But for players who understand utility-based combat — grenadiers, support players, and Clash Squad specialists — Beaston is arguably the most impactful pet in the game.
Beaston was introduced in the OB25 update and was first available for 699 diamonds in the pet store or through a top-up recharge event (140 diamonds in select regions). He’s a large, bear-like creature whose in-game description reads simply: “With Beaston by your side, your throws become more powerful!” His appearance might be imposing, but his real strength is invisible — it’s the extra 30% on every throwable arc.
Helping Hand — How Beaston’s Ability Works
Helping Hand
| Pet Level | Skill Level | Throw Distance Increase | Affected Throwables |
|---|---|---|---|
| Level 1 | Skill Lv 1 | +10% | All 4 types |
| Level 4 | Skill Lv 2 | +20% | All 4 types |
| Level 7 | Skill Lv 3 (MAX) | +30% | All 4 types |
Beaston’s Helping Hand affects exactly four throwable types: Hand Grenades (explosive damage), Gloo Wall Grenades (defensive cover), Flashbangs (vision disruption), and Smoke Grenades (area concealment). It does NOT affect weapon firing range, melee attacks, or any other mechanic. The +30% applies to the maximum throw distance — how far the item travels when you aim at maximum arc.
How +30% Throw Distance Changes Gameplay
Grenades become mid-range weapons. Without Beaston, grenades max out at approximately 15 meters of throw distance. With Beaston, that extends to roughly 19.5 meters. This means you can lob grenades into second-story windows from street level, throw over Gloo Wall barriers that enemies thought were safe, and reach enemies hiding behind rocks or trees at distances where they don’t expect explosive damage.
Gloo Walls reach further defensive positions. Normally, Gloo Wall throw range limits where you can place cover. With Beaston’s +30%, you can throw Gloo Walls to protect downed teammates who are further away, place walls at angles that cut off enemy rotations from a safer distance, and create defensive barriers in spots that would normally require you to run out into the open to reach.
Flashbangs clear rooms from outside. Without Beaston, flashbanging a room often requires standing in the doorway — exposing yourself to return fire. With +30% range, you can throw flashbangs through windows from further back, clear rooms from around corners with higher arc throws, and blind enemies in positions they thought were out of flashbang range.
Smoke Grenades cover wider rotations. +30% throw distance on smoke grenades means you can create smoke screens from further away, covering open-field rotations without needing to run into the open first. This is particularly valuable in ranked Battle Royale when moving between zones.
How to Get Beaston in Free Fire
Store purchase: Beaston is available in the pet store for 699 diamonds (standard pet price).
Events: Beaston has been offered through various top-up events and login rewards. He was initially available through a 140-diamond top-up recharge on select servers. Garena has included Beaston in free pet selection events alongside Mr. Waggor and other pets. Check the Events tab regularly.
Redeem codes: Beaston has appeared in redeem code rewards. Follow our redeem codes page for daily updates.
Leveling priority: Beaston goes from +10% (Level 1) to +30% (Level 7) — tripling the throw distance bonus. The difference is huge in practice: +10% is barely noticeable, while +30% visibly extends your grenade arcs. Only invest pet food in Beaston if you actively use throwables — if you rarely throw grenades or flashbangs, spend your pet food on Mr. Waggor or Rockie instead.
Best Characters to Pair With Beaston
Beaston synergizes with characters whose abilities relate to explosives, Gloo Walls, or tactical utility. The best combos amplify Beaston’s throwable range with character abilities that increase throwable damage or interact with Gloo Walls.
S-Tier
S-Tier
A-Tier
A-Tier
Alvaro + Beaston is the undisputed best grenadier combo in Free Fire. Here’s why: Alvaro increases explosive damage by up to 20% AND expands blast radius through his awakened ability. Beaston increases throw distance by 30%. Combined, your grenades fly 30% further, deal 20% more damage, and explode in a wider area. No other pet + character combination in the game produces this level of throwable dominance. If you play a grenadier role in your squad, this is the combo.
Beaston vs Other Pets
VS
Mr. Waggor
Ability
Smooth Gloo
Effect
Free Gloo Walls
Playstyle
Defensive
Best Mode
S-Tier (Solo BR)
Overall Tier
S-Tier
Beaston vs Mr. Waggor: Different tools for different jobs. Mr. Waggor generates free Gloo Walls — essential for defensive play in ranked BR. Beaston throws existing throwables further — essential for offensive utility in Clash Squad. Mr. Waggor is S-Tier overall because Gloo Walls matter in every match. Beaston is A-Tier because his value depends on whether you use throwables. For Clash Squad, Beaston is arguably better than Mr. Waggor because throwable combat decides more rounds than Gloo Wall generation (which is too slow for CS rounds anyway).
Beaston vs Rockie: Rockie reduces active skill cooldowns by 15% — universally useful for characters like Alok and Chrono. Beaston’s throwable range is situational. Pick Rockie for consistency across all fights. Pick Beaston when your playstyle revolves around grenades, flashbangs, and tactical throwable usage.
Beaston vs Yeti: Yeti reduces explosive damage taken by 30% — the defensive counter to Beaston’s offensive throwable boost. Yeti is a Clash Squad specialist that counters grenade-heavy opponents. Beaston IS the grenade-heavy player. If you throw grenades, use Beaston. If you face grenades, use Yeti.
Beaston Pet Skins & Emotes
Pet skins in Free Fire are cosmetic only — they don’t affect Helping Hand’s ability or stats.
Event Exclusive
Seasonal
Free with Pet
Beaston Emotes
Beaston has 3 pet emotes that unlock as you level up:
Celebration (Level 2) — triggers automatically when you kill an enemy or use a medkit. Beaston raises his fists in a victory pose. Play (Level 3) — manually triggered via command wheel. Beaston playfully bounces around. Show (Level 4) — manually triggered. Beaston flexes his muscles and strikes a power pose, reflecting his massive build.
Browse our pet images gallery for HD visuals of all Beaston skins.
Beaston Tips & Tricks
01
02
03
04
05
06
07
08
Beaston in Battle Royale vs Clash Squad
Clash Squad — S-Tier
Beaston is at his absolute best in Clash Squad. Short rounds mean every utility throw matters — there’s no time for passive abilities like Gloo Wall generation to accumulate value. Instead, the immediate +30% throw range on grenades and flashbangs creates tactical advantages from round one. A well-placed long-range grenade flush wins a round before guns are even fired. Beaston users control the pace of Clash Squad rounds through superior utility placement.
Budget tip: buy 2 grenades and 1 flashbang in early CS rounds instead of a Level 2 vest. With Beaston’s range, those 3 throwables can secure a round win more reliably than extra armor.
Battle Royale (Ranked) — A-Tier
In Battle Royale, Beaston is A-Tier — useful but not essential. The +30% throw range helps with grenade flush plays, smoke rotations, and Gloo Wall placement throughout a 15-minute match. However, Mr. Waggor’s infinite Gloo Wall generation provides more consistent value across the entire match. Beaston’s value in BR depends on how aggressively you use throwables — passive players get almost nothing from him.
Beaston shines in squad BR specifically, where one player can serve as the designated grenadier, throwing long-range utilities for the team while teammates focus on gunfights. In solo BR, Beaston is less impactful because you’re the only one throwing, and Mr. Waggor’s sustained Gloo Wall supply is more reliable for survival.
Beaston Frequently Asked Questions
Explore More Free Fire Pets & Guides
Browse all 27 pets, weapon guides, and ranked strategies on Free Fire Nation.

Written by
Free Fire Nation Team
Free Fire Nation is a dedicated gaming editorial team covering Free Fire news, weapon guides, esports, and redeem codes since 2019. All content is tested in-game and verified against official Garena sources.