
Free Fire M79 Gun – Stats, Skins, Tips & Complete Guide
By Free Fire Nation Team • Free Fire Guns
M79 is the most misunderstood weapon in Free Fire. Most players walk right past it. The ones who pick it up usually waste their single grenade on an empty building and never touch it again. But in the hands of a player who understands area-of-effect damage, arc trajectory, and timing — the M79 grenade launcher is one of the most devastating weapons in the entire game.
Here’s the reality: M79 deals 90 damage in an area of effect. That’s the same base damage as the AWM — except it doesn’t need a headshot, and it hits everyone standing near the blast radius, not just one target. A single well-placed M79 grenade can wipe an entire squad hiding behind a Gloo Wall. No other weapon in Free Fire can do that with one bullet.
The catch? M79 holds exactly 1 grenade. One shot. You fire, you reload, you fire again. Miss that shot and you’re standing there defenseless for 2+ seconds while the reload animation plays. M79 doesn’t forgive mistakes. It rewards precision, positioning, and patience — and it punishes panic fire harder than any other weapon in the game.
This guide covers everything about the M79 grenade launcher: base stats, how area damage actually works, all M79 skins ranked, comparison with MGL140 and RGS50, best character pairings, aiming techniques for arc trajectory, when to pick it up vs when to leave it, and pro-level tips for using M79 in ranked and Clash Squad.
M79 Base Stats
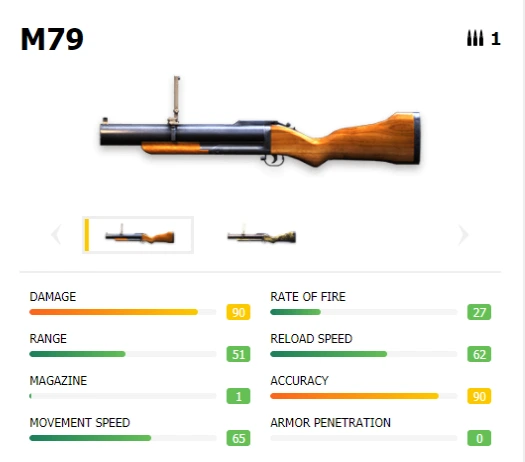
| Stat | Value |
|---|---|
| Damage | 90 |
| Range | 51 |
| Magazine | 1 grenade |
| Movement Speed | 62 |
| Rate of Fire | 27 |
| Reload Speed | 76 |
| Accuracy | 65 |
| Armor Penetration | 0% |
| Ammo Type | 40mm Grenades |
| Damage Type | Area of Effect (AOE) |
| Weapon Category | Launcher |
| Availability | Ground loot (rare spawn) |
| Attachment Slots | None |
M79’s 90 base damage places it in the same damage tier as AWM and M82B — the highest in Free Fire. But unlike snipers, M79 deals area damage. The grenade explodes on impact and damages every player within the blast radius, not just the one you aimed at. In squad fights, this means a single M79 shot can deal 90 damage to 2, 3, or even 4 enemies simultaneously.
The 1-round magazine is M79’s defining limitation. Every other stat — 90 damage, 65 accuracy, 62 movement speed, 76 reload speed — is strong for a launcher. But that single bullet means every shot has to count. There’s no spray-and-pray with M79. It’s a surgical strike weapon.
M79 accepts no attachments. What you pick up is what you get. No scope, no muzzle, no magazine upgrade. The only way to improve M79’s performance is through gun skins that modify stats.
How M79 Area Damage Works
Understanding area-of-effect damage is the difference between wasting M79 and dominating with it. Here’s how it actually works in Free Fire:
Direct hit vs splash damage. If the grenade lands directly on a player, they take the full 90 damage. Players near the explosion take reduced damage based on their distance from the blast center. The closer they are to the impact point, the more damage they take.
Blast radius. M79’s explosion covers a significant area — roughly the size of a Gloo Wall’s width in every direction from the impact point. This means you don’t need pinpoint accuracy. Landing the grenade “near” an enemy is often enough to deal significant damage.
Gloo Wall destruction. M79 grenades destroy Gloo Walls on impact. This is one of M79’s most powerful tactical uses — an enemy building a wall for cover is actually giving you a target to aim at. Hit the Gloo Wall with M79 and you destroy their cover while simultaneously dealing splash damage to anyone standing behind it.
Vehicle damage. M79 deals heavy damage to vehicles. A single grenade can destroy a partially damaged vehicle outright, and even a full-health vehicle takes massive damage. In squads, M79 is one of the most effective anti-vehicle weapons alongside RGS50.
Self-damage. Be extremely careful at close range. M79 grenades can damage you if you’re too close to the explosion. Never fire M79 at an enemy who’s directly in your face — switch to your primary weapon instead.
Arc trajectory. Unlike bullets, M79 grenades follow an arced path. They don’t fly straight. You need to aim above your target at longer distances, and the grenade will drop in a curve. A red tracer line appears when you aim, similar to throwing a hand grenade, showing you the approximate landing zone.
M79 vs MGL140 vs RGS50 — All Launchers Compared
Free Fire has three launchers. Here’s how they compare:
| Stat | M79 | MGL140 | RGS50 |
|---|---|---|---|
| Damage | 90 | 90 | 90 |
| Range | 51 | 51 | 100 |
| Magazine | 1 | 5 | 3 |
| Movement Speed | 62 | 76 | 62 |
| Rate of Fire | 27 | 33 | 27 |
| Reload Speed | 76 | 76 | 90 |
| Accuracy | 65 | 65 | 65 |
| Special | AOE damage | AOE, high fire power | Vehicle lock-on |
| Availability | Ground loot | Very rare | Event exclusive |
| Tier | C-Tier | A-Tier | B-Tier |
M79 vs MGL140
MGL140 is objectively the better launcher. It has the same 90 damage and 51 range as M79, but with a 5-grenade magazine instead of 1. That alone makes MGL140 dramatically stronger — you can spam 5 grenades in rapid succession, clearing entire areas without reloading. MGL140 also has better rate of fire (33 vs 27) and higher movement speed (76 vs 62).
The only advantage M79 has over MGL140 is availability. M79 spawns as ground loot (though rarely), while MGL140 is extremely rare and practically impossible to find in normal matches. In most games, you’ll never see an MGL140. M79 is the launcher you’ll actually get to use.
M79 vs RGS50
RGS50 is the “anti-vehicle” launcher with a unique straight-line projectile path (no arc) and vehicle lock-on ability. It has double the range of M79 (100 vs 51) and holds 3 rounds. However, RGS50 deals less damage to non-vehicle targets, making it weaker than M79 against players. RGS50 was also event-exclusive and is no longer available in regular matches.
Bottom line: M79 is the most commonly available launcher. It’s the weakest of the three in a vacuum, but it’s the one you’ll actually find and use in real matches. If you know how to aim the arc trajectory and position yourself correctly, M79’s 90 AOE damage is enough to swing fights in your favor.
All M79 Skins in Free Fire (Ranked)
M79 has a smaller skin pool than popular weapons like AK47 or MP40, but several skins provide meaningful stat boosts that address the weapon’s core weaknesses.
1. M79 – Hipster Bunny (Best Overall)
The Hipster Bunny is a legendary skin and the strongest M79 skin available. It provides double range buffs and a magazine buff while reducing reload speed. Range and magazine are the two most important stats for M79 — extended range lets you fire from safer distances, and the magazine buff is critical because M79’s base magazine of 1 is its biggest weakness. Any extra capacity dramatically increases your combat effectiveness.
Stat changes: Range ++ | Magazine + | Reload Speed −
2. M79 – Master of Minds
Master of Minds provides damage and range buffs while reducing rate of fire. Since M79 already has the lowest rate of fire among common weapons, the reduction barely matters in practice — you’re reloading after every shot anyway. The extra damage and range make each shot significantly more impactful.
Stat changes: Damage + | Range + | Rate of Fire −
3. M79 – Deadly Bat
Deadly Bat offers rate of fire and magazine buffs while reducing reload speed. The magazine increase is the key benefit here — turning M79 from a single-shot weapon into something slightly more forgiving. The rate of fire buff helps you fire slightly faster between reloads.
Stat changes: Rate of Fire + | Magazine + | Reload Speed −
4. M79 – Pink Devil
Pink Devil provides a double magazine buff with a minor reload speed reduction. Since M79’s entire weakness revolves around its 1-round magazine, a Magazine ++ is extremely valuable. This skin is one of the oldest M79 skins, introduced in 2019, and is now considered a rare collectible among veteran players.
Stat changes: Magazine ++ | Reload Speed −
5. M79 – Mechanical
A rare skin with a clean mechanical design. It offers minor stat adjustments and is valued more for its visual appeal and rarity than raw combat improvements.
Stat changes: Minor adjustments
Skin priority for M79: Magazine is the single most important stat to buff on M79. Any skin that increases magazine capacity (Pink Devil, Hipster Bunny, Deadly Bat) transforms the weapon from “one mistake and you’re dead” to “you get a second chance.” Range is the second priority — it lets you fire from safer distances where the slow reload won’t get you killed. Check our gun images gallery and items database for the latest available skins in your region.

Best Characters to Pair With M79
M79’s playstyle is unique — you’re lobbing explosives, not spraying bullets. The best character pairings enhance survivability, damage, and blast effectiveness rather than the usual accuracy/recoil buffs that work for regular guns.
Tier 1: Best for M79 Users
Alvaro — This is the single best character for M79. Alvaro’s ability Art of Demolition increases explosive weapon damage and blast radius. This directly buffs M79’s grenade damage and makes the explosion cover a larger area, requiring less precision. Alvaro turns M79 from a niche weapon into a legitimate threat. If you’re serious about using M79, Alvaro is non-negotiable.
Chrono (Counter) — While Chrono isn’t paired “with” M79, it’s worth noting that M79 is one of the best weapons against Chrono’s shield. M79 grenades bypass Chrono’s force field because the explosion deals AOE damage that penetrates the barrier. In the 2026 meta where Chrono is widely used, carrying an M79 specifically to counter Chrono shields is a legitimate strategy.
Jota — HP recovery on kills. Since M79 often secures kills (90 damage in an AOE frequently eliminates weakened enemies), Jota’s passive triggers consistently. This keeps you alive in extended fights where you’re cycling between M79 and your primary weapon.
Tier 2: Strong Alternatives
Alok — Healing aura and speed boost. M79 users need to reposition constantly after firing (your position is revealed by the explosion), and Alok’s speed boost helps you move to a new angle quickly. The healing compensates for any splash damage you take from close-range shots.
K (Captain Booyah) — EP conversion for sustained health. M79 fights tend to be drawn-out repositioning battles rather than quick spray-downs, and K’s passive keeps your HP topped off between exchanges.
Maro — Increases damage based on distance to target. Since M79 is most effective at mid-range (15–30 meters), Maro’s distance damage bonus adds extra punch to every grenade at the ranges where M79 performs best.
Best M79 Character Combination
Active: Alok (healing + speed) + Passive 1: Alvaro (explosive damage + blast radius) + Passive 2: Jota (HP on kill) + Passive 3: Maro (distance damage)
This build maximizes M79’s explosive damage through Alvaro, keeps you alive through Jota and Alok, and adds bonus damage at M79’s ideal engagement range through Maro. Alvaro is the core — the other three slots support survivability.
M79 Aiming Guide — How to Aim Arc Trajectory
M79 is the hardest weapon to aim in Free Fire because it doesn’t shoot in a straight line. The grenade follows an arced trajectory, dropping as it travels. Here’s how to master it:
Understanding the Arc
When you aim M79, a red tracer line appears showing the approximate path of the grenade. This arc behaves exactly like a hand grenade throw — the grenade rises, reaches a peak, and drops down to the landing zone. The further you aim, the higher the arc and the longer the travel time.
Aiming by Range
Close range (0–10 meters): Aim directly at the enemy. The arc is minimal at this distance. But be extremely careful of self-damage — if the target is too close, the explosion will hurt you too. Generally, avoid using M79 at point-blank range entirely.
Mid range (10–25 meters): This is M79’s sweet spot. Aim slightly above the target’s head level. The grenade will arc and land at their feet. The red tracer helps you calibrate, but with practice, you’ll develop muscle memory for this distance.
Long range (25–51 meters): Aim significantly above the target. The grenade needs a high arc to reach distant enemies, and there’s a noticeable travel time. At this range, you’re predicting where the enemy will be when the grenade arrives, not where they are now. Best used against stationary targets or groups clustered behind cover.
Aim at the Ground, Not the Enemy
The most common M79 mistake is aiming directly at the enemy’s body. Since M79 deals area damage, you actually want to aim at the ground near their feet. A grenade that hits the ground next to 3 enemies deals splash damage to all of them. A grenade that hits one enemy directly deals full damage to that one player but might miss the others entirely.
Pro tip: Aim at Gloo Walls, vehicles, and terrain features near enemy clusters. The explosion will destroy the cover AND damage everyone nearby.
When to Pick Up M79 — and When to Leave It
M79 is a situational weapon. Knowing when it’s worth carrying and when to skip it is crucial for ranked play.
Pick Up M79 When:
You already have a strong primary weapon. M79 works as a secondary/utility weapon alongside an AK47, M4A1, or SCAR. You use M79 for the opening shot to destroy cover and deal AOE damage, then switch to your primary to finish kills.
You see Gloo Wall-heavy players. M79 is the hard counter to Gloo Wall camping. If the final circle has players building walls constantly, M79 destroys their strategy in one shot.
You’re playing squads. AOE damage is significantly more valuable in squad modes where enemies cluster together. A single M79 grenade that hits a 4-man squad deals 90 damage to each player — that’s 360 total damage from one bullet.
Late game with vehicles. M79 destroys vehicles extremely quickly. If enemies are using vehicles for rotations in final circles, M79 stops them instantly.
You have Alvaro equipped. With Alvaro’s explosive damage boost, M79 goes from “situational” to “genuinely dangerous.” Don’t carry M79 without Alvaro unless you’re very confident in your aim.
Leave M79 When:
You don’t have a primary weapon yet. M79 cannot be your only weapon. Its 1-round magazine and slow reload mean you’re defenseless between shots. Always secure an AR or SMG first.
Solo matches against spread-out enemies. M79’s AOE advantage disappears in solos where enemies are scattered. One-on-one, an MP40 or UMP will kill faster than M79 in almost every scenario.
You can’t find 40mm grenade ammo. M79 ammo is extremely rare. If you pick up M79 with only 2–3 grenades and can’t find more, you have a weapon that’s useless after 3 shots. Make sure there’s ammo nearby before committing a weapon slot to M79.
Close-quarters building fights. M79 self-damage makes it dangerous inside buildings. The blast radius in tight corridors can kill you as easily as the enemy. Use your MP40, Vector, or M1887 for building clears instead.
Best Gun Combos With M79
M79 is a utility weapon, not a primary. Here are the best pairings:
- M79 + AK47 — Open with M79 to destroy Gloo Walls and deal AOE damage, then switch to AK47 to finish weakened enemies. The highest damage combo available.
- M79 + M4A1 — M4A1’s accuracy and stability handle the gunfight after M79 softens the target. More forgiving than AK47 for players who need reliable spray-downs.
- M79 + MP40 — Aggressive close-to-mid combo. M79 opens from mid-range, MP40 pushes for the finish at close range. High-risk, high-reward.
- M79 + AWM — Double the high-damage potential. M79 handles groups and cover destruction, AWM handles single-target elimination at long range. Both weapons share the “one shot matters” philosophy.
- M79 + UMP — UMP’s armor penetration compensates for M79’s 0% armor pen. UMP handles the sustained fighting while M79 provides burst AOE.
M79 Tips and Tricks
Basic Tips (Beginner)
- Always carry a primary weapon alongside M79. M79 is never your main gun. It’s a tool you switch to for specific situations — destroying Gloo Walls, hitting groups, damaging vehicles — then you switch back to your AR or SMG.
- Aim at the ground near enemies, not at their bodies. Ground-level explosions deal splash damage in a radius. Hitting the ground between two enemies damages both of them. Hitting one enemy directly might miss the other entirely.
- Watch the red tracer arc before firing. The tracer shows you exactly where the grenade will land. Take an extra half-second to confirm your aim before pulling the trigger — you only get one shot before reloading.
- Never fire M79 at point-blank range. The explosion will damage you. If an enemy rushes you while M79 is equipped, switch weapons immediately. Don’t try to be a hero with a grenade launcher at 2 meters.
- Look for 40mm grenade ammo before committing. M79 ammo is rare. Check the nearby area for additional grenades before dedicating a weapon slot to M79. Having 5+ grenades makes M79 viable. Having 1–2 means it’s a waste of a slot.
Advanced Tips (Pro Level)
- Use M79 as an opening move in squad fights. Fire the M79 grenade at the enemy squad’s position first — the AOE damage will weaken multiple enemies simultaneously. Then immediately switch to your primary weapon and push while they’re recovering.
- Destroy Gloo Walls strategically. Don’t waste M79 on random walls. Wait until an enemy builds a Gloo Wall and positions behind it. The grenade destroys the wall AND deals splash damage to the player behind it. This turns their defensive move into a liability.
- Fire M79 from elevated positions. The arc trajectory works better when you have height advantage. From a rooftop or hill, M79 grenades rain down on enemies with excellent coverage and minimal chance of self-damage. Pair this with a 2x or 4x scope on your primary weapon for follow-up shots.
- Count enemy healing after M79 hits. After landing an M79 grenade on an enemy group, wait 1–2 seconds before pushing. If they’re healing, they can’t fire back. If they’re running, they’re not healing. Either way, you’ve created a window. Push during that window with your primary weapon.
- Use M79 to flush campers from buildings. Fire a grenade through windows or doors. The explosion inside a small room is devastating — there’s nowhere for the camper to dodge the blast radius. This is more effective than pushing inside with an SMG, where the camper has the angle advantage.
- Pair M79 with Alvaro’s ability for maximum blast radius. Alvaro’s Art of Demolition increases both damage and explosion radius for explosive weapons. With Alvaro active, M79’s blast zone expands significantly, requiring less precision and hitting enemies who would normally be outside the damage range.
- Switch fire angles between M79 shots. After firing, don’t reload in the same position. Move 5–10 meters to a different angle while reloading, then fire again from the new position. This prevents enemies from predicting your next grenade and makes it harder for them to push you during the reload animation.
M79 in Clash Squad vs Ranked
Clash Squad
M79 is a niche pick in Clash Squad. Its main value is destroying Gloo Wall setups — in a mode where teams often wall up and hold angles, a single M79 grenade can collapse an entire defensive position. The problem is the 1-round magazine. In Clash Squad’s fast-paced rounds, reloading after every shot is extremely punishing. If you carry M79 in Clash Squad, treat it as a one-time surprise weapon — fire the grenade to open the round, then fight the rest of the round with your primary gun. See our Clash Squad tips guide for round-by-round strategy.
Ranked (Battle Royale)
M79 is stronger in ranked Battle Royale than in Clash Squad, particularly in the late game. Final circles compress players into tight areas where AOE damage becomes extremely valuable. A well-placed M79 grenade in a crowded final zone can hit multiple enemies and create chaos that you exploit with your primary weapon.
The key decision in ranked is when to start carrying M79. Early game, the weapon slot is better used for a second primary weapon or a sniper. Mid-to-late game, once you’re fully geared with a strong primary weapon and have spare grenades, swapping your secondary for M79 can give you a decisive advantage in the final fights.
Best maps for M79: Bermuda’s tight final zones and building clusters make M79 particularly effective. Kalahari’s open spaces are less ideal — enemies are spread out and the lack of cover means AOE advantage is reduced.
M79 Damage Breakdown
Since M79 deals area damage, the actual damage depends on proximity to the blast center:
| Target | Damage (approx) |
|---|---|
| Direct hit, no armor | 90 |
| Direct hit, Level 1 Vest | ~68 |
| Direct hit, Level 2 Vest | ~54 |
| Direct hit, Level 3 Vest | ~40 |
| Splash (near blast center) | ~60–80 |
| Splash (edge of blast) | ~30–50 |
| Gloo Wall | Destroys instantly |
| Vehicle (full health) | ~70% damage |
For exact calculations with your specific skin and character combo, use our gun damage calculator.
Key insight: M79’s 0% armor penetration means direct hits against armored enemies deal significantly reduced damage. However, the AOE splash damage partially compensates — hitting the ground near enemies avoids some of the armor damage reduction compared to a direct body hit. In late-game fights against Level 3 armor, M79 is best used as a Gloo Wall destroyer and area denial tool rather than a primary damage source.
Common Mistakes With M79
- Using M79 as a primary weapon. M79 is a utility tool, not a main gun. Its 1-round magazine makes sustained fighting impossible. Always carry an AR or SMG alongside it.
- Firing at point-blank range. Self-damage is real. If an enemy is within 5 meters, switch to your other weapon. Don’t grenade yourself.
- Carrying M79 without enough ammo. 40mm grenades are extremely rare. If you only have 1–2 shots, M79 isn’t worth the weapon slot. You need at least 4–5 grenades to justify carrying it.
- Aiming directly at enemies instead of the ground. M79’s AOE damage is maximized when the grenade hits the ground near groups. Aiming at one enemy’s body wastes the splash damage potential.
- Forgetting to switch weapons after firing. The reload animation is slow. After firing M79, immediately switch to your primary weapon if an enemy is pushing you. Don’t stand there reloading while they rush your position.
- Using M79 inside tight buildings. The blast radius in corridors and small rooms can damage you as easily as the enemy. Use grenades instead — they have a cooking mechanic that gives more control.
- Ignoring M79 in final circles. Many players discard M79 in late game, but this is when it’s strongest. Compressed final zones mean every M79 grenade has maximum AOE value.
Frequently Asked Questions
What is M79 damage in Free Fire? M79 deals 90 base damage per grenade as area-of-effect damage. A direct hit on an unarmored player deals full 90 damage, while splash damage to nearby enemies ranges from 30 to 80 depending on distance from the blast center.
Is M79 good in Free Fire? M79 is a situational C-Tier weapon. It’s powerful in specific scenarios — destroying Gloo Walls, dealing AOE damage to squads, damaging vehicles — but its 1-round magazine and arc trajectory make it unreliable as a primary weapon. With Alvaro’s ability and practice, it can be very effective.
How to aim M79 in Free Fire? M79 fires grenades in an arc trajectory, not a straight line. A red tracer shows where the grenade will land. Aim at the ground near enemies rather than at their bodies to maximize splash damage. Aim higher for longer distances.
What ammo does M79 use? M79 uses 40mm grenade ammunition, which is extremely rare as ground loot. The ammo is shared across all three launchers (M79, MGL140, RGS50).
Can M79 destroy Gloo Walls? Yes. M79 grenades destroy Gloo Walls on impact while simultaneously dealing splash damage to anyone standing behind the wall. This is one of M79’s strongest tactical uses.
Which is better — M79 or MGL140? MGL140 is objectively better with its 5-round magazine, higher rate of fire (33 vs 27), and better movement speed (76 vs 62). Both deal 90 damage with the same range (51). However, M79 is much easier to find since MGL140 is extremely rare.
Does M79 have self-damage? Yes. If you fire M79 too close to your own position, the explosion will damage you. Avoid using M79 at point-blank range — maintain at least 5 meters of distance from the blast zone.
What is the best character for M79? Alvaro is the best character for M79. His Art of Demolition ability directly increases explosive weapon damage and blast radius, making M79 grenades more powerful and easier to hit.
Can M79 damage vehicles? Yes. M79 deals heavy damage to vehicles and can destroy partially damaged vehicles in a single shot. It’s one of the most effective anti-vehicle weapons in Free Fire alongside RGS50.
What is the best skin for M79? Hipster Bunny is the best M79 skin with Range ++ and Magazine + buffs. Pink Devil is the second-best pick thanks to its Magazine ++ buff that addresses M79’s biggest weakness.
Where to find M79 in Free Fire? M79 spawns as rare ground loot across all maps. It’s more commonly found near military zones, outposts, and high-loot areas. The 40mm grenade ammo spawns separately and is also rare.
Is M79 better than grenades? M79 has longer range and faster deployment than hand grenades, but grenades have a cooking mechanic that lets you time the explosion. M79 explodes on impact, which is simpler but less controllable. M79 is better for direct hits on Gloo Walls; hand grenades are better for bouncing into rooms and around corners.
Final Thoughts
M79 will never be a meta weapon. It won’t appear in tier lists above C or B-Tier. No pro player is going

Written by
Free Fire Nation Team
Free Fire Nation is a dedicated gaming editorial team covering Free Fire news, weapon guides, esports, and redeem codes since 2019. All content is tested in-game and verified against official Garena sources.
