Free Fire Interactive Drop Map Planner
Use Free Fire Drop Map Planner to explore all 6 maps with toggleable loot zones, vehicle spawns, vending machines, sniper spots & revival points
Select a Map
Tap a map to explore its locations, loot zones and strategic points.
Free Fire Drop Map Planner — Interactive Loot, Vehicle & Strategy Map for All 6 Maps
Your landing spot decides 70% of your match outcome. That’s not an exaggeration — it’s something every Heroic and Grandmaster player will tell you. Drop at the wrong place and you’re back in the lobby within 30 seconds. Drop at the right place and you’re fully geared with Level 3 vest, an AR, and a rotation plan before the first zone even starts shrinking.
The Free Fire Drop Map Planner above is the first tool of its kind built specifically for Free Fire players. It covers all 6 battle royale maps — Bermuda, Bermuda Remastered, Purgatory, Kalahari, Alpine, and NeXTerra — with toggleable overlays for loot zones, vehicle spawns, vending machines, sniper vantage points, revival points, and hot/safe drop classifications.
No more guessing. No more dying because you didn’t know a vehicle spawns behind Observatory or that Forge on Purgatory has high-tier loot but almost nobody lands there. This tool puts every strategic data point on one interactive map you can zoom, pan, and tap through — on your phone, right before you queue up.
How to Use the Free Fire Drop Map Planner
Using the tool is straightforward. Here’s how to get the most out of it:
Select your map from the grid at the top. All six official Free Fire maps are available — tap the one you’re about to play on.
Once the map loads, you’ll see location markers placed at every named spot on the map. Each marker is color-coded by loot tier — orange for high-tier loot zones, purple for mid-tier, and grey for low-tier.
The real power is in the toggle bar at the bottom. You can switch on or off eight different overlays depending on what information you need right now. Toggle “Loot Tiers” to see color-coded zones across the entire map. Switch on “Vehicles” to find exactly where jeeps, pickups, and sports cars spawn. Turn on “Vending” to see every vending machine location. “Sniper Spots” highlights elevated positions with clear sightlines. “Revival Points” shows where your squad can revive downed teammates. “Hot Drops” and “Safe Drops” glow red or green respectively.
Tap any location marker and a detail card pops up showing the location name, loot tier, risk level out of 5, best weapons for that area, recommended playstyle (aggressive, passive, squad, solo), and a specific strategy tip for that spot.
You can pinch to zoom on mobile or scroll-zoom on desktop. When zoomed in, drag the map to pan around. The zoom buttons on the right side let you zoom in, zoom out, or reset the view.
Pro tip: Use the ?map=bermuda URL parameter to share a direct link to a specific map with your squad on WhatsApp or Discord.
All 6 Free Fire Maps Covered
The planner covers every map currently in Free Fire’s rotation. Here’s what makes each one different and why your drop strategy needs to change between them.
Bermuda — The Classic Battleground
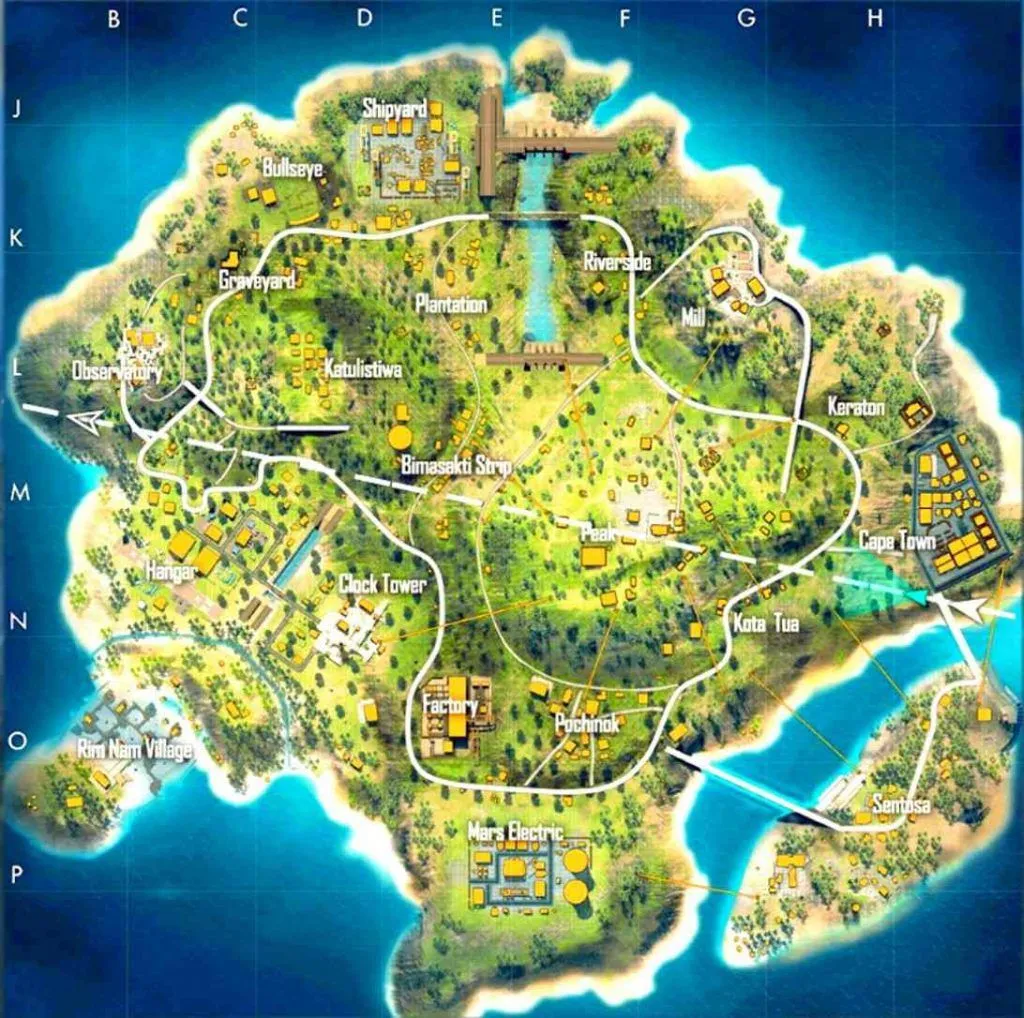
Bermuda is where most players start and where most ranked matches happen. It measures roughly 4×4 km with a compact design that forces encounters within the first 60 seconds. The map has a mix of urban zones (Clock Tower, Factory), open terrain (Cape Town area), and elevated positions (Peak, Observatory).
Key fact most guides miss: Bermuda was specifically designed for 10-minute matches. The entire zone geometry and shrink speed are calibrated for fast, decisive games. That means your drop decision matters even more here than on larger maps — you don’t have time to loot for 5 minutes and then rotate. You need a plan from second one.
Our tool shows 11 locations on Bermuda, from the suicide-hot Clock Tower (risk 5/5) to the peaceful Mars Electric at the southern edge (risk 2/5). If you’re pushing rank and need consistency, the data in this tool will show you which spots offer the best loot-to-risk ratio. Check our detailed Bermuda map guide for even deeper strategy breakdowns.
Purgatory — The Long-Range Map
Purgatory is the largest-feeling map in Free Fire. It’s dominated by open fields, bridges, and a massive river that splits the southwest portion of the map. This is where snipers thrive and where bad rotations get you killed faster than any enemy.
What our tool shows that others don’t: Purgatory’s bridge chokepoints are genuine death zones during mid and late game. The planner’s location cards specifically warn you about bridge gatekeeping risks at spots like Marbleworks and Golf Course. Toggle the “Sniper Spots” overlay to see exactly which elevated positions control the bridges.
Ten locations are mapped including the underrated Forge (high loot, risk 2/5) — genuinely one of the safest high-tier loot spots in the entire game.
Kalahari — The Desert Deathmatch

Kalahari is a sniper’s paradise with open deserts, rocky outcrops, and the multi-level Refinery at its center. The terrain is vertical — elevation matters more here than on any other map. The distances between locations are wide open with almost no natural cover.
The planner shows 11 locations including unique features like The Maze (a literal labyrinth where shotguns rule), Mammoths (giant skeleton structures with high-tier loot but zero cover), and Santa Catarina (a docked galleon ship). Each location card includes the specific weapon type that dominates there — you don’t bring a sniper to The Maze.
Alpine — The Snow Map
Alpine is the largest map at 8×8 km with snowy terrain, ski areas, and reduced visibility due to weather effects. The snow diminishes contrast, making it harder to spot enemies. Snowmobiles are the best transport option here.
The tool maps 9 key locations. Toggle “Vehicles” to find snowmobile spawns — on Alpine, having a vehicle isn’t a luxury, it’s survival.
NeXTerra — The Futuristic Playground
NeXTerra is Free Fire’s most unique map with anti-gravity zones, magic portals, and a neo-futuristic aesthetic. The Grav Labs area literally removes gravity — you jump higher, take no fall damage, and enemies can attack from above. The Intellect Center sits on a separate island connected to the mainland.
Our tool maps 10 locations with special feature callouts. The location card for Grav Labs warns you that enemies come from every direction including overhead. Deca Square is marked as risk 5/5 — the hottest drop on the entire map.
Bermuda Remastered
An upgraded version of Classic Bermuda with new locations (Nurek Dam, Academy, Samurai’s Garden, Aden’s Creek) and improved visuals. The planner maps 8 locations and marks which ones are exclusive to the Remastered version.
Why Landing Spot Choice Wins or Loses Games
Here’s what separates a Gold player from a Grandmaster: the Grandmaster never lands without a plan.
Most players pick a favorite spot and drop there every single game regardless of the flight path, the zone, or what their squad needs. That’s a losing habit. A proper drop decision considers three things:
Flight path direction — If the plane flies directly over Refinery on Kalahari, half the lobby will land there. You’re better off dropping to Command Post or Bayfront when the path is central. Use the Free Fire sensitivity calculator to make sure your aim settings are locked in before entering high-risk zones.
Zone prediction — Early zone indicators tell you which side of the map will be safe. Landing on the opposite side means you’ll spend half the game running from blue. The Drop Map Planner’s vehicle overlay helps you identify vehicle spawns near every location so you can plan your rotation even before you jump.
Squad composition — A squad running two snipers should avoid Factory. A squad with an aggressive rusher and three support players should skip safe drops entirely. The location cards in our tool include “Best For” tags that match playstyles to spots.
8 Overlay Layers Explained
The toggle bar gives you eight distinct data layers. Here’s exactly what each one shows and when to use it.
Locations (📍) — All named locations as markers. This is on by default. Color-coded by loot tier.
Loot Tiers (💎) — Colored zone overlays around each location. Orange glow = high-tier loot (best weapons, Level 3 gear). Purple glow = mid-tier (solid AR and SMG spawns). Grey = low-tier (pistols, basic vests). Toggle this on before choosing your drop to visualize where the best gear concentrates.
Hot Drops (🔥) — Red glow highlighting locations where the most players typically land. These spots guarantee early fights. Clock Tower on Bermuda, Refinery on Kalahari, Deca Square on NeXTerra — if you see red, expect combat within 10 seconds of landing.
Safe Drops (🛡️) — Green glow highlighting low-traffic locations. Forge on Purgatory, Cape Town on Bermuda, Old Hampton on Kalahari. These are where rank pushers go when they need placement points over kill points.
Vehicles (🚗) — Exact vehicle spawn locations. Knowing where to find a jeep is critical for late-game zone rotations, especially on larger maps like Alpine and Purgatory.
Vending (🏧) — Vending machine positions. These machines let you buy revival tickets and supplies using tokens found across the map. Knowing vending locations means your squad can revive fallen teammates faster than relying on revival points.
Sniper Spots (🎯) — Elevated positions with clear sightlines. Toggle this if you’re running a sniper build. Peak on Bermuda, Ski Lodge on Purgatory, and Refinery on Kalahari are all marked. Pair this info with our Free Fire gun damage calculator to know exactly how much damage your sniper does at each armor level.
Revival Points (❤️) — Heart markers showing where revival points are placed. These open 50 seconds after the match starts and close 50 seconds before the final zone. They have a 2.5-minute cooldown between uses. All revival points are in exposed locations with no cover — so your squad needs to provide security while reviving.
Best Landing Strategies by Rank Tier
Not every rank plays the same. Here’s how to use the Drop Map Planner based on where you are in the ranking system.
Bronze to Gold — Focus on safe drops. Toggle the green “Safe Drops” overlay and land at those spots every game. Your goal isn’t kills — it’s learning the map, understanding zone rotations, and making it to the top 10 consistently. Spots like Cape Town, Hangar, and Mars Electric on Bermuda are perfect. Check our best HUD layout guide to make sure your controls aren’t holding you back at this stage.
Gold to Diamond — Start experimenting with mid-risk locations. Toggle both “Loot Tiers” and “Vehicles” to find spots that have solid loot AND a nearby vehicle for rotation. Bimasakti Strip and Pochinok on Bermuda, Bayfront on Kalahari — these balance risk with reward.
Diamond to Grandmaster — You need to be flexible. Study every location card in the planner. Know which spots are hot when the flight path crosses them and which become safe when the path goes the other direction. Toggle the “Sniper Spots” overlay and memorize elevated positions for late-game advantage. Use the clash squad tips guide to sharpen your combat sense alongside map knowledge.
Vehicle Spawn Locations You Need to Memorize
Vehicles aren’t just for fun in Free Fire — they’re survival tools. When the zone pulls to the opposite side of the map, having a vehicle is the difference between dying to the blue zone and reaching safety with full health.
The Drop Map Planner’s vehicle overlay shows spawn points for jeeps, pickup trucks, sports cars, and boats (on maps with water). But here are the spawns most players overlook:
Bermuda: Observatory almost always has a vehicle. Mars Electric has reliable spawns near the towers. Factory’s parking area spawns jeeps frequently.
Purgatory: Forge has a vehicle that most players never take because nobody lands there. Lumber Mill and Moathouse both have reliable spawns.
Kalahari: Command Post and Bayfront are your best bets. The desert is deadly on foot — never cross open sand without a vehicle if you can help it.
Alpine: Look for snowmobiles. They’re the fastest way to travel on the snow map and they spawn near most named locations. Check the vehicle overlay for exact positions.
Map-Specific Tips That Competitors Don’t Cover
Here’s where our tool gives you an edge over generic map guides that just list location names.
Purgatory bridge rule: Never cross a bridge on foot after the first zone shrinks. Toggle “Sniper Spots” and you’ll see that every bridge on Purgatory is within sightline of at least one elevated position. Swim instead — it’s slower but you won’t get one-tapped crossing a bridge.
Kalahari zigzag rule: The open desert has no cover. If you’re caught rotating between locations, move in zigzag patterns. The “Safe Drops” overlay shows which locations have natural rock cover nearby — use those as waypoints.
NeXTerra portal trick: NeXTerra has magic portals for instant two-way travel. The location cards mark which spots have portals nearby. Use them to escape fights you’re losing or to flank enemies who don’t expect you to appear behind them.
Alpine visibility rule: Snow reduces contrast. Players wearing default dark outfits are easier to spot against white terrain. On Alpine, your outfit choice actually affects gameplay — and knowing where Snowfall and Militia are (toggle the map to see) helps you plan positions where terrain breaks up your silhouette.
Bermuda rooftop meta: On Bermuda, whoever controls the rooftops at Clock Tower and Factory usually controls the area. The location cards for these spots specifically mention rooftop strategies. Read our headshot tricks guide to dominate rooftop peek battles.
How This Tool Helps Your Squad Coordination
Solo queue is one thing. Squad play is where the Drop Map Planner becomes genuinely powerful.
Before queuing up, open the planner on your phone and share the map view with your squad on a WhatsApp call. Use the deep link feature — send freefirenation.com/free-fire-drop-map-planner/?map=kalahari and everyone sees the same map instantly.
Toggle the overlays together. One squad member checks loot tiers, another checks vehicle spawns, another scans sniper positions. In 30 seconds, your entire squad has a shared mental model of where to drop, where to find vehicles, and which direction to rotate.
This is how pro teams prepare for tournament matches — they don’t wing it. They study the map, assign roles per location, and have backup plans. Now you can do the same thing without a coaching staff.
What Makes This Tool Different from Other Map Guides
Every Free Fire map guide on the internet is a static article. They list locations, add some generic tips like “aim for the head” and “loot fast,” and call it done.
This tool is different because it’s interactive and visual. You see the actual map with markers you can tap. You toggle overlays to see exactly the information you need — not everything at once, and not buried in paragraphs you have to read. It works on your phone because 90% of Free Fire players play on mobile, and every button is designed for thumb-friendly tap targets.
The location data is also more specific than what you’ll find elsewhere. Each location card doesn’t just say “good loot” — it tells you the exact loot tier, the risk level scored 1-5, which weapon types dominate that spot, which playstyle suits it, and a specific tip written for that exact location. That level of detail per location, across 6 maps and 59 total locations, isn’t available anywhere else in one tool.
If you want to test the gun damage numbers we reference in the location cards, use the Free Fire gun damage calculator to see exactly how much each weapon hits at different armor levels.
Frequently Asked Questions
What is the Free Fire Drop Map Planner? It’s an interactive tool on Free Fire Nation that lets you explore all 6 Free Fire battle royale maps with toggleable overlays for loot zones, vehicle spawns, vending machines, sniper vantage points, hot drops, safe drops, and revival points. You tap locations to see detailed strategy cards.
Which Free Fire maps are included in the planner? All six official maps: Bermuda, Bermuda Remastered, Purgatory, Kalahari, Alpine, and NeXTerra. Each map has between 8 and 11 locations mapped with full data including loot tier, risk level, best weapons, and strategy tips.
Does the Drop Map Planner work on mobile? Yes. It’s built mobile-first since over 90% of Free Fire players are on mobile devices. You can pinch to zoom, drag to pan, and tap markers to see location details. All toggle buttons are designed for thumb-friendly use.
What do the loot tier colors mean? Orange zones indicate high-tier loot (Level 3 gear, best weapons). Purple zones indicate mid-tier loot (solid ARs and SMGs). Grey zones indicate low-tier loot (basic weapons and gear). Toggle the “Loot Tiers” button to see these zones on the map.
How do I find vehicle spawns on the map? Tap the “Vehicles” toggle button in the control bar. Yellow car icons will appear at every known vehicle spawn point. This is especially important on larger maps like Alpine and Purgatory where vehicles are essential for zone rotations.
Where are vending machines located in Free Fire? Vending machines have fixed spawn locations on each map. Toggle the “Vending” overlay to see green icons at every vending machine position. On Bermuda, they appear at locations like Shipyard, Pochinok, Observatory, Cape Town, Mill, Hangar, and Mars Electric.
What’s the difference between hot drops and safe drops? Hot drops are locations where many players typically land — expect immediate combat within seconds. Safe drops are low-traffic areas where you can loot peacefully. The planner marks hot drops with a red glow and safe drops with a green glow when you toggle those overlays.
Can I share a specific map with my squad? Yes. Add ?map=bermuda (or kalahari, purgatory, alpine, nexterra, bermuda_remastered) to the URL and share it. Your squad opens the link and lands directly on that map view.
How accurate are the location risk ratings? Risk ratings from 1 to 5 are based on player traffic density, proximity to center, loot quality, and cover availability. A 5/5 risk spot like Clock Tower or Refinery sees heavy early-game fighting. A 1/5 spot like Old Hampton is almost always empty. These ratings reflect typical ranked match behavior.
What are revival points and how do they work? Revival points are fixed locations where a teammate can revive all fallen squad members. They appear 50 seconds after the match starts and close 50 seconds before the final zone. They have a 2.5-minute cooldown. Toggle the “Revival Pts” overlay to see heart markers at every revival point location.
Which map is best for rank pushing? Bermuda is the most consistent for rank pushing because of its balanced design and predictable rotations. Use the planner to identify 2-3 safe drops with nearby vehicle spawns on Bermuda. Alternate between them based on flight path direction.
Will more maps be added to the planner? Yes. When Garena releases new maps or updates existing ones, we’ll update the planner with new locations, adjusted loot tiers, and any changed vehicle or vending machine spawn points.
Explore Other Tools
Check out more Free Fire tools built for you