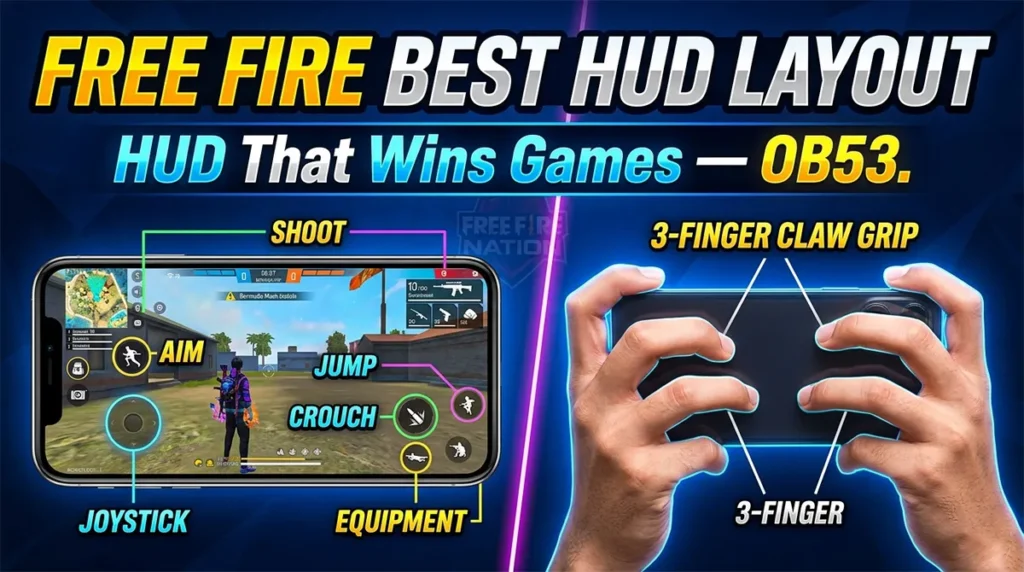
Free Fire Best HUD Layout Guide — Button Placement That Actually Wins Games (OB53)
Most players tweak their sensitivity endlessly but completely ignore the one setting that determines whether their thumbs actually reach the fire button in time.
Here’s a scenario you might recognize: you spot an enemy, your brain says “shoot,” but your thumb has to travel an extra half-inch across the screen. That half-inch is the difference between a Booyah and a lobby screen. Your HUD layout — where every button sits on your screen — determines exactly how fast your fingers find the right control under pressure.
The problem with most HUD guides circulating on YouTube and gaming sites is they show you their layout without telling you why it works for their specific device and hand size. A layout built for a 6.7-inch phone with a 4-finger claw grip will absolutely fail on a 5.5-inch budget phone with thumb-only play. This matters especially for Indian players, many of whom play on phones in the 6.1 to 6.5-inch range with a 3-finger semi-claw grip.
This guide fixes that. By the end, you’ll know exactly where to place every combat and movement button based on your device size, your grip style, and your personal reaction patterns. No generic layouts — just principles you can apply immediately in OB53.
Why Your Current HUD Is Probably Losing You Fights
Your default Free Fire HUD was designed for one thing: looking clean in screenshots. It was not designed for competitive play.
The default layout places critical combat buttons — fire, scope, jump, crouch — at the edges of the screen. For a thumb player on any phone over 6 inches, this means stretching your thumb to uncomfortable positions every time you engage. Stretching introduces three problems:
-
Slower reaction time: Your thumb has to travel further before registering the tap
-
Inconsistent aim: Moving your thumb to hit a button shifts your phone’s balance, throwing off your gyro or drag aim
-
Fatigue in long sessions: Constant stretching leads to slower play in late-game ranked matches
Pro Tip: Watch any Free Fire tournament stream and pause during a close-range fight. You’ll notice pro players’ fire buttons sit in the bottom-third center of their screen — not at the far right edge. There’s a reason for that.
The good news? Free Fire has one of the most flexible custom HUD editors in mobile battle royale. Almost every button can be moved, resized, and set to different opacity levels. Most players use maybe 20% of what this editor can actually do.
FreeFireNation Recommendation: Before adjusting your HUD, take a screenshot of your current layout from the settings menu. If your new layout feels worse after testing, you can restore it in seconds instead of rebuilding from memory.
Understand This Before Touching a Single Button
Before dragging buttons around blindly, you need a framework. Every HUD decision traces back to two factors: your grip style and your device size.
Grip Style Determines Your Finger Zones
| Grip Type | Fingers Active | Best Device Size | Ranked Viability |
|---|---|---|---|
| Thumb-only (2-finger) | Both thumbs | Under 6.1 inches | Casual to Gold |
| Semi-claw (3-finger) | Thumbs + right index | 6.1–6.5 inches | Platinum to Heroic |
| Full claw (4-finger) | Thumbs + both index fingers | Over 6.5 inches | Grandmaster+ |
The most common setup among Indian ranked players grinding through Diamond and Heroic is the 3-finger semi-claw. The right index finger handles the fire button and scope, while the left thumb controls movement and the right thumb handles aim, crouch, and jump. This setup gives you the advantage of firing without lifting your aiming thumb — a massive edge in close-range 1v1 gunfights.
Common Mistake: Players new to claw grip put the fire button too high, forcing the index finger into an awkward curl. Place the fire button roughly where your right index finger naturally rests when holding the phone — usually in the upper-left quadrant of the right half of the screen.
Device Size Changes Everything
A button placed 2 inches from the bottom bezel on a 6.8-inch phone requires a full thumb extension for many players. On a 5.5-inch phone, the same distance is barely a stretch.
Here’s a quick reference:
-
Small phones (under 6 inches): You can cluster buttons closer to screen edges since your thumbs easily cover the full display
-
Mid-size phones (6.1–6.5 inches): This is the sweet spot for 3-finger claw. Critical buttons should sit in a semi-circular arc in the bottom third
-
Large phones (6.6+ inches): You almost need claw grip to play competitively. Buttons must be aggressively repositioned toward the center-bottom zone
Quick Note — OB53: The latest patch didn’t change HUD customization features, so all advice here applies to the current version. If Garena adds new buttons in future patches, revisit your layout.
The 3 Best HUD Layouts for Ranked (Copy These, Then Customize)
These layouts are starting points, not rigid prescriptions. Copy one that matches your grip, then we’ll talk about customization principles in the next section.
HUD 1: Thumb-Only Layout (Beginners / Casual Players)
Button Placements:
-
Fire button: Dead center of the right half, about 1.5 inches from the bottom edge. Resize to 130–140%.
-
Movement joystick: Default position (bottom-left) is actually fine here. Reduce size slightly to 90% to prevent accidental full-tilt movements.
-
Scope button: Directly above the fire button, about 1 inch higher. This lets your right thumb toggle between firing and scoping without repositioning your hand.
-
Jump and Crouch: Stacked vertically on the far right edge, jump on top of crouch. Each set to 110% size for easier thumb hits.
-
Reload: Bottom-center, between the fire button and movement joystick. 100% size, 60% opacity so it doesn’t distract visually.
-
Weapon swap: Small button (80% size) next to the fire button on its left side.
Why this works: Every button sits within a natural thumb arc. No stretching means faster reactions. The trade-off is you can’t fire and aim independently — your right thumb does both tasks sequentially, not simultaneously.
Best for: Players on phones under 6 inches, casual matches, and Clash Squad modes where engagements are more predictable.
HUD 2: 3-Finger Semi-Claw (The Indian Ranked Meta)
This is the layout you’ll see in 70% of Diamond-through-Heroic lobbies in India.
Button Placements:
-
Fire button (index finger): Top-left of the right screen half. Resize to 150% — your index finger needs a bigger target than your thumb. Set opacity to 30–40% so you can see enemies behind it.
-
Scope button (index finger): Immediately below the fire button, roughly half an inch away. This keeps both index-finger actions in one compact zone.
-
Movement joystick (left thumb): Default position, 100% size. Do not change this — your left thumb is dedicated to movement.
-
Aim area (right thumb): The entire bottom-right quadrant stays clear for drag-aiming and gyro micro-adjustments.
-
Jump and Crouch: Right edge, mid-screen height, stacked vertically. Your right thumb can hit these without leaving the aim zone entirely.
-
Reload: Left edge, about one-third up from the bottom. Left thumb can tap this when you’re behind cover and movement isn’t urgent.
-
Weapon swap: Between the movement joystick and the right screen edge, bottom-center. 90% size.
Why this works: Your right index finger handles all firing, freeing your right thumb to purely aim. This is a massive advantage in close-range SMG and shotgun fights where tracking a moving target while firing is the difference between a knock and getting knocked.
Pro Tip: If you’re new to 3-finger claw, your index finger will feel clumsy for the first 3–5 matches. Stick with it. After about an hour of play, the awkwardness disappears and you’ll wonder how you ever played without it.
Best for: Mid-size phones (6.2–6.5 inches), ranked grinders in Diamond and above, aggressive playstyles.
HUD 3: 4-Finger Full Claw (Tournament-Level Control)
This layout is rare outside competitive circles but offers the highest skill ceiling. Every major esports player in FFWS runs some variation of a 4-finger HUD.
Button Placements:
-
Fire button (right index): Upper-right corner, 140% size, 25% opacity.
-
Scope button (right index): Half an inch left of the fire button.
-
Movement joystick (left thumb): Default position.
-
Jump button (left index): Top-left corner, 120% size. This lets you jump-shoot without any thumb involvement.
-
Crouch button (left index): Directly below the jump button.
-
Aim area (right thumb): Bottom-right quadrant stays completely clear.
-
Reload and weapon swap: Moved to the top-center of the screen, between the two index-finger zones. Both set to 80% size.
Why this works: All four fingers have dedicated jobs. Your thumbs only handle movement (left) and aim (right). Your index fingers handle all actions — firing, scoping, jumping, crouching. This is the closest mobile gaming gets to keyboard-and-mouse control separation.
Trade-off: This HUD requires the most practice time. Your left index finger is especially awkward for the first week. The phone also needs to be rested on a surface or held with your remaining fingers gripping the sides, which can cause hand fatigue in sessions longer than two hours.
Best for: Phones 6.6 inches and above, competitive esports players, anyone willing to invest serious practice time.
How to Place Buttons Based on Your Personal Reaction Patterns
Here’s where this guide goes beyond every other HUD article. Layouts aren’t just about grip — they’re about your specific reflexes under pressure.
Test Your Natural Reaction Zones
Do this quick exercise right now:
-
Open Free Fire’s training mode
-
Close your eyes and hold your phone in your normal playing grip
-
Imagine an enemy suddenly appears directly in front of you
-
Tap where your finger naturally wants to go to shoot
-
Open your eyes and note that spot on the screen
That spot — not the default fire button position — is where your fire button belongs. Your natural reaction zone is faster than any consciously memorized button location.
Repeat this test for:
-
Where your finger goes to jump when surprised
-
Where your finger goes to crouch-slide
-
Where your finger goes to scope
Build your HUD around these natural zones and you’ll reduce reaction time by 50–100 milliseconds. That’s the difference between shooting first and watching a kill cam.
The “Panic Test” Method
After building a new HUD, play three unranked Clash Squad matches without thinking about your layout. Just play instinctively.
Watch the replay of each match and note every moment you:
-
Hit the wrong button
-
Hesitated before pressing a button
-
Had to glance at the screen to find a control
Adjust those specific buttons based on what you see. One adjustment per match. Within 10 matches, your HUD will be genuinely personalized — not copied from a YouTube video.
Free Fire Bio Generator – Stylish FF Bio Codes Online
⚠️ Important — Read This Before You Start! ❌ You will see CODE — not colours. That is…

Free Fire Colourful Bio – 500+ Copy & Paste Bio Colour Codes
Free Fire Colourful Bio – 500+ Copy & Paste Bio Colour Codes (2026) Your Free Fire profile is…

Free Fire Symbols Copy Paste — 500+ FF Symbols for Name, Bio & Guild
Free Fire Symbols Copy Paste — 500+ FF Symbols for Name, Bio & Guild If you’ve ever tried…
Controller-Style Overlays: The Hidden Feature Most Players Ignore
Free Fire offers something called “control overlays” — alternative input methods that change how buttons behave, not just where they sit.
“Hold to Scope” vs “Tap to Scope”
This is the single most impactful control setting in Free Fire and most players never change it from default.
Hold to Scope: You press and hold the scope button, and releasing it unscopes you. This is faster for quick peek-shots with marksman rifles and snipers.
Tap to Scope: You tap once to scope in, tap again to scope out. This is better for assault rifle mid-range fights where you stay scoped through an entire magazine.
FreeFireNation Recommendation: If you play aggressive AR in ranked, use Tap to Scope. If you snipe or use DMRs heavily, switch to Hold to Scope. Snipers who stay scoped in after a shot are easy targets — Hold to Scope forces you out of the scope the moment you release, which is a good discipline to build.
Left-Side Fire Button
Free Fire gives you a secondary fire button on the left side of the screen, disabled by default. Enabling this is a game-changer for claw players.
With a left-side fire button, you can:
-
Fire with your left index while your right hand handles movement and aim simultaneously
-
Engage in “jiggle-peek” gunfights where you strafe in and out of cover while firing continuously
-
Reduce right-index fatigue in long ranked sessions by alternating firing fingers
Enable it in Settings → Controls → Left Fire Button. Place it somewhere your left index finger naturally hovers.
Common HUD Mistakes That Keep You in Gold
Mistake 1: Button Sizes That Are All the Same
Not every button deserves equal screen real estate. Your fire button should be your largest control (140–150%). Non-combat buttons like backpack, map, and settings can be shrunk to 60–70% and pushed to corners. This declutters your screen for the buttons that actually win gunfights.
Mistake 2: Full Opaque Buttons Blocking Vision
Every combat button sitting over the main gameplay area — fire, scope, jump — should have opacity set between 25% and 40%. You need to see enemies, not button art. The muscle memory you build makes the visual aspect irrelevant after a week.
Mistake 3: Copying a Pro Player’s HUD Without Adjusting for Device
A layout built for a 6.8-inch ROG Phone running a 4-finger claw will not function on a 6.1-inch budget phone with thumb-only play. Use pro layouts as inspiration for button grouping logic, not as exact coordinate maps.
Mistake 4: Adjusting Everything at Once
Change one button position per match. Test it under real fire. Adjust if needed. Changing 10 buttons simultaneously and jumping into ranked is the fastest way to drop tiers.
Common Mistake: The biggest error intermediate players make after switching to claw is keeping the default fire button size. Index fingers are less precise than thumbs — give them a bigger target. 140% minimum for any index-finger-operated button.
Testing Your New HUD Before Risking Ranked Points
Never test a new layout in ranked. Here’s a structured testing progression:
-
Training Mode (10 minutes): Practice movement, firing, scoping, jumping, and crouching in sequence. Build the basic muscle map.
-
Unranked Battle Royale (2 matches): Hot-drop in a contested area both times. You want chaotic fights that force instinctive button use.
-
Unranked Clash Squad (3 matches): Fast-paced, close-quarters engagements test whether your button placement handles pressure.
-
Ranked Clash Squad (1 match): If you feel confident after unranked testing, one ranked CS match reveals whether you revert to old habits under stakes.
-
Ranked Battle Royale: Only after you’ve passed all four previous stages.
This progression takes about 90 minutes total. That’s less time than recovering lost ranked points from a bad HUD switch.
FAQ
1. What is the best HUD layout for a 6.5-inch phone in Free Fire?
A 3-finger semi-claw HUD works best on mid-size phones. Place the fire button in the upper-left quadrant of the right screen half for your index finger, keep the right thumb zone clear for aiming, and stack jump/crouch on the right edge. This balances control and comfort without requiring the full claw grip.
2. Should I use claw grip if I play on a small phone?
Claw grip on phones under 6 inches is usually unnecessary and uncomfortable. Your thumbs can already reach the entire screen on smaller devices. Stick with thumb-only or try a hybrid where only the fire button moves to an index finger position while everything else stays thumb-controlled.
3. How often should I change my Free Fire HUD layout?
Once you find a layout that works, change it rarely. Make micro-adjustments (one button at a time) based on specific issues you notice in matches. Major HUD overhauls should only happen when you switch grip styles or upgrade to a significantly different device size.
4. Does button opacity affect gameplay or just visibility?
Opacity is purely visual — it doesn’t affect how the button registers inputs even at 0% opacity. Lower opacity helps you see enemies through your controls. Many pro players run their fire button at 20–30% opacity because the muscle memory makes the visual completely unnecessary after enough practice.
5. Can I use the same HUD layout on Free Fire MAX?
Yes. Free Fire and Free Fire MAX share the same control settings and HUD editor. If you’ve already built a layout on standard Free Fire, you can screenshot your settings page and recreate it in Free Fire MAX. There is no import/export feature, so manual recreation is required.
Your HUD Won’t Fix Bad Positioning — But It Removes Every Excuse
A perfect HUD layout doesn’t make you a better player. It removes the physical barriers preventing you from playing at your actual skill level. When your buttons sit exactly where your fingers naturally want to go, you stop thinking about controls and start thinking about rotations, positioning, and engagement timing.
The real test isn’t whether a layout looks clean in screenshots. It’s whether, three hours into a ranked grind, your fingers still find the fire button before your brain consciously tells them to.
Start with one of the three base layouts above, run the panic test across five matches, and adjust one button at a time. Within a week, you’ll have something no YouTube video can give you: a HUD built for your hands, your device, and your reflexes.
Related Guides:
External Reference:
-
Garena Free Fire Official Site — Check for patch notes that may affect HUD features
1 Discussion