Free Fire 3 Finger Claw Settings + HUD Code — The Only Guide You Need
Let’s be real about something first.
Most “3 finger claw” guides out there are copy-paste sensitivity tables with zero context. They give you numbers, you plug them in, and then you play worse for three days, assume the layout is broken, and go back to 2-finger thumb play.
That’s not a settings problem. That’s a transition problem — and nobody talks about it.
This guide does three things nobody else does together in one place: gives you the actual layout logic (not just the numbers), walks you through importing a HUD code properly, and tells you exactly what to expect during the first week so you don’t quit before the magic kicks in.
What Is 3 Finger Claw and Why Does It Actually Matter?
In standard 2-finger play, your two thumbs handle everything — movement, aim, fire, skills, Gloo Wall. That means every time you fire, your thumb leaves the joystick. Every time you place a Gloo Wall, your aim drops.
3 finger claw changes that equation entirely.
You introduce your left index finger as a dedicated action finger. Now:
- Left thumb → Movement joystick only
- Left index finger → Fire button (left side)
- Right thumb → Aim, ADS, scope, secondary actions
The result: you can move, aim, and fire simultaneously. No hand-off, no delay. This is why every competitive Free Fire player above Diamond uses some form of claw grip.
The jump from 2-finger to 3-finger claw is the single biggest mechanical upgrade you can make. A 3 to 4x improvement in reaction speed in close fights is realistic — not because you’re suddenly a better player, but because the control system stops getting in your way.
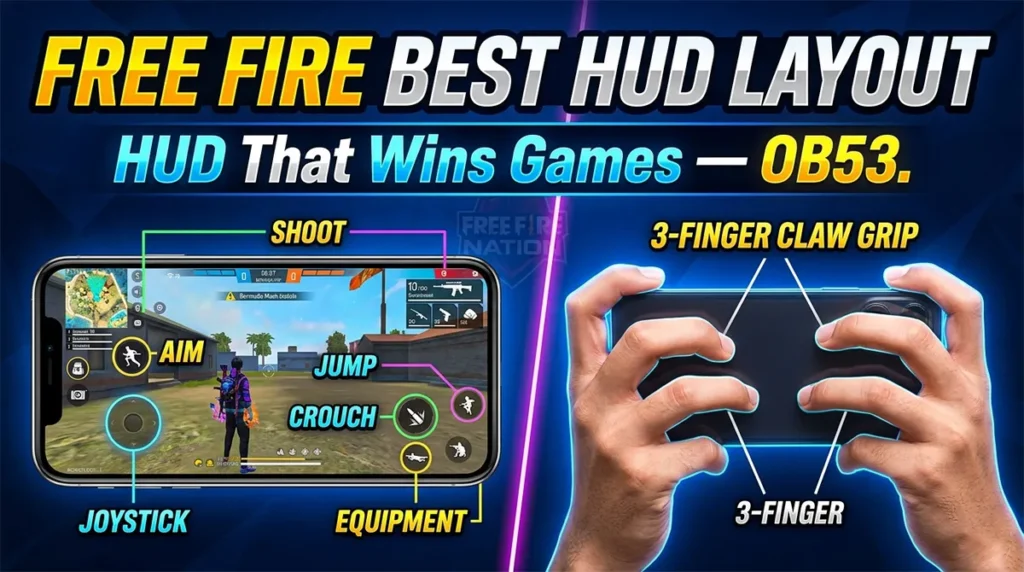
The Finger Assignment — Exactly Where Each Finger Goes
Before touching sensitivity settings, you need to understand what each finger is physically doing on your screen. This is where most guides skip straight to numbers, and where most players set up their HUD wrong.
Left Thumb (Bottom Left Zone)
Your left thumb never leaves the joystick during a fight. Its jobs:
- Joystick (movement)
- Sprint toggle (top of joystick or nearby)
- Jump button (reachable without lifting off joystick)
- Grenade (secondary position)
Placement principle: Everything the left thumb touches should be reachable without shifting the palm. If you have to slide your hand to reach a button, it’s placed wrong.
Left Index Finger (Middle Left Zone)
This is your new fire finger — the whole point of claw. Its jobs:
- Primary fire button (left-side placement, large size)
- Crouch (reachable with same finger)
- Reload (optional, some players prefer right thumb here)
Placement principle: The fire button should sit roughly where your left index finger naturally rests when you hold the phone in claw grip. Don’t place it where it looks right on screen — place it where your finger actually hovers.
Right Thumb (Right Zone)
Your right thumb handles precision. Its jobs:
- ADS / scope button
- Primary fire button (right side — yes, you have two fire buttons)
- Medkit / heal
- Character ability
- Loot / interact
Placement principle: ADS and fire should be close together but not overlapping. Your right thumb should be able to tap ADS then immediately fire without repositioning.
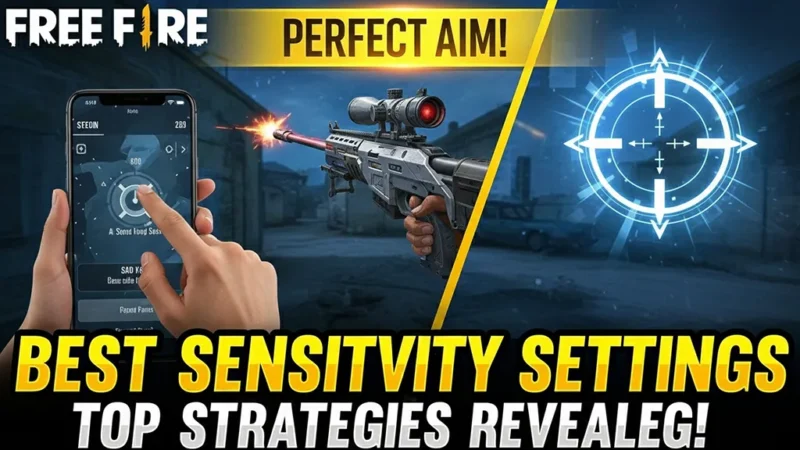
Sensitivity Settings for 3 Finger Claw — With Explanations
Here’s the thing about sensitivity tables: the numbers mean nothing without knowing why they’re that value. So here’s both.
For Players WITHOUT Gyroscope (Most Common)
| Setting | Value | Why |
|---|---|---|
| General | 90–100 | High general sens = faster crosshair sweeps. 3-finger players can handle higher without losing aim because the index finger fires — thumb isn’t doing both jobs |
| Red Dot | 85–95 | Close-range fights happen fast. You need to snap to heads quickly |
| 2x Scope | 75–85 | Medium range — slightly slower for better control during spray |
| 4x Scope | 60–70 | You’re making precision shots here. Lower = more control per pixel of movement |
| AWM / Sniper Scope | 30–45 | Anything above 50 at sniper scope makes micro-corrections nearly impossible |
| Free Look | 60–70 | Used for scanning without moving your body. Mid-range keeps it useful without making it jittery |
Starting point recommendation: Begin at the lower end of each range (90, 85, 75, 60, 30, 60). One week in, raise each slider by 5 if it still feels sluggish. Never raise all at once — change one, test in training, then decide.
For Players WITH Gyroscope Enabled
Gyroscope adds a physical tilt layer on top of touch. When active, your phone’s tilt handles fine micro-corrections while your fingers handle big movements.
| Setting | Value | Why |
|---|---|---|
| General | 95–100 | Same logic, gyro handles the correction layer |
| Red Dot | 90–100 | Aggressive close-range; gyro keeps you on target |
| 2x Scope | 75–85 | Keep touch sens here; gyro handles vertical |
| 4x Scope | 65–75 | Slightly higher than non-gyro because tilt corrects overshots |
| Sniper Scope | 35–45 | Gyro at 20–40 handles sniper micro-aim — touch sens lower to avoid overshooting |
| Gyroscope | 20–40 | This is your recoil correction range. Start at 25, go up by 5 if it’s not correcting enough |
| Free Look | 65–75 |
Gyroscope tip: Gyro is for small vertical corrections, not big horizontal turns. Tilt down slightly to counter upward recoil. Do NOT swing your whole arm — small wrist rotations only. This takes 3–5 days to feel natural.
The HUD Layout — Button Placement Logic
Now for the HUD itself. The layout is where most guides just paste a code and say “import this.” That’s not helpful if you want to understand what you’re doing or customize it.
Core Principles for a 3-Finger HUD
1. The fire button on the left must be large Your left index finger is new to this role — it needs a big target. Make the left fire button noticeably larger than you think necessary. You can reduce it later as muscle memory develops.
2. Joystick stays small and bottom-left Counter-intuitively, a smaller joystick gives you more precision. Keep it in the far bottom-left corner where your thumb naturally rests.
3. Jump and Gloo Wall on opposite sides Putting jump and Gloo Wall on the same side causes finger collisions under pressure. Jump goes left-side (accessible to left thumb), Gloo Wall goes right-side or center-right.
4. Scope and fire (right side) must be close but not overlapping Your right thumb needs to tap ADS and then immediately fire. Test the distance in training — you should be able to tap ADS, then fire without repositioning your thumb.
5. Skill, Grenade, Medkit go to corners or top zone These are used less frequently. Move them out of the main combat zone so they don’t accidentally get pressed during a fight. Reduce their opacity to 60-70%.
6. Make sure crouch is reachable by left index finger Since your left index is on fire, crouch should be nearby. Crouch is essential for headshot drag techniques — you need fast access.
Recommended Button Layout Zones
SCREEN (landscape)

LEFT SIDE                          RIGHT SIDE
┌─────────────────────────────────────────────────────┐
│  [Gun Switch] [Reload]         [Scope] [Medkit]     │
│                                                      │
│                           [Grenade]  [Skill]        │
│  [FIRE L]  [Crouch]                    [FIRE R]     │
│                                          [ADS]      │
│  [Jump]   [Sprint]                                  │
│  [Joystick]      [Gloo Wall]                        │
└─────────────────────────────────────────────────────┘
How to Import a HUD Code in Free Fire (Step-by-Step)
Free Fire introduced HUD code sharing in the OB50 update. Here’s exactly how to use it:
To import someone’s HUD code:
- Open Free Fire → tap the Settings icon (top-right corner of lobby)
- Go to the “In Match” tab
- Scroll to find your Custom HUD Presets (you can have multiple saved)
- Tap the “Use Share Code” button
- Paste the HUD code → confirm
- The layout imports automatically — button positions update instantly
To share your own HUD code:
- Settings → In Match → Custom HUD
- Arrange your layout
- Tap the Share icon at the top
- Copy the generated code — share via WhatsApp, Telegram, wherever
Important: Importing a code changes button positions but preserves your sensitivity settings. Your sensitivity remains your own — only the layout changes.
⚠️ HUD codes are device-responsive but not perfectly universal. A layout built on a 6.7″ screen may feel cramped on a 5.5″ screen. Always verify button positions after importing and adjust any that feel out of reach.
Phone Size Matters — Adjusting the Layout for Your Screen
This is the section nobody writes. Your phone’s screen size directly affects where buttons should be placed.
Small screen (under 6″): e.g. iPhone SE, Samsung Galaxy A13
- Smaller joystick, tighter button clusters
- Left fire button must be further inward (your index finger can’t reach the very edge)
- Reduce button sizes across the board
- Gloo Wall may need to move closer to center
Medium screen (6″–6.5″): Most popular range
- Standard layout works well
- This is what most HUD codes are built around
- Use the sensitivity values in this guide as-is
Large screen (6.5″+): e.g. iPhone 14 Pro Max, Samsung S24 Ultra
- You have room — use it
- Spread buttons further apart; your fingers won’t collide
- Can use slightly larger fire buttons
- Joystick can go further into the corner
- Gyroscope becomes easier to control on large screens (more surface area = smoother tilts)
The Transition Plan — Day by Day
This is the most important section, and it exists nowhere else in this format.
When you switch to 3-finger claw, you will get worse before you get better. This isn’t a flaw in the setup — it’s neurological. Your hands have muscle memory built for 2-finger. Overwriting it takes time.
Here’s what to realistically expect:
Days 1–2: Training Mode Only Do not touch ranked. Only play in Training Island. Focus entirely on getting the left index fire button to feel natural. Don’t worry about aim. Just practice the motion of fire → crouch → fire without dropping the joystick. Do this for 20 minutes before any real match.
Days 3–4: Casual Matches Only (No Rank) You’ll misfire, you’ll fat-finger the wrong button, you’ll lose fights you would have won before. This is expected. Do not switch back to 2-finger — that resets your progress. After each match, identify the one button you pressed wrong most often and consciously fix its position or your muscle memory during training.
Days 5–7: First Ranked Matches Your aim will still be slightly off, but your movement-while-firing will already feel more natural. You’ll notice you’re surviving longer in close fights because you don’t stop moving to shoot. Headshots will come inconsistently but they’ll come.
Week 2+: The Payoff Players who stick with 3-finger claw consistently report that after 10–14 days, returning to 2-finger feels genuinely uncomfortable. The control ceiling is significantly higher. Close-range duels where you previously traded or lost will start going your way because you stayed mobile while firing.
The rule: If you’re going to try 3-finger claw, commit to at least 7 days before judging it. Anyone who switched back on day 3 was one day away from the layout clicking.
Common Setup Mistakes to Avoid
Mistake 1: Placing the left fire button where it looks good, not where your finger actually rests Hold your phone in claw grip right now. Where does your left index finger naturally hover? That’s where the button goes. Not where it looks symmetrical on screen.
Mistake 2: Copying someone else’s sensitivity without adjusting for your phone A high-refresh-rate phone (90Hz, 120Hz) responds faster to touch — lower sensitivity slightly. A laggy phone needs higher sensitivity to compensate. There’s no universal answer.
Mistake 3: Keeping skill and ability buttons in the combat zone Moving Alok’s ability or a grenade button while you’re trying to aim costs you fights. Push non-essential buttons to the periphery where they’re reachable but not accidental.
Mistake 4: Using the same sensitivity as before When you add a dedicated fire finger, your aiming thumb gets freed up. This means your previous sensitivity settings likely feel too slow. Increase General and Red Dot by 10–15 points from your 2-finger baseline.
Mistake 5: Not testing in Training Island after any change If you change one slider and immediately go into ranked, you have no data on whether the change helped. Always test in Training first — at least 10 minutes of active aim practice per change.
Quick Reference Card
Sensitivity (No Gyro, Medium Speed Hands) General: 95 | Red Dot: 90 | 2x: 80 | 4x: 65 | Sniper: 38 | Free Look: 65
Sensitivity (With Gyro) General: 98 | Red Dot: 95 | 2x: 80 | 4x: 70 | Sniper: 40 | Gyro: 28 | Free Look: 70
Layout Priority Order (set these first)
- Left fire button position
- Joystick size and position
- ADS + right fire button proximity
- Jump button (left thumb reachable)
- Gloo Wall (right side, away from jump)
- Everything else
Transition Timeline Days 1–2: Training only → Days 3–4: Casual only → Day 5+: Ranked
Final Thought
3-finger claw isn’t a secret weapon. Every high-rank player in Free Fire is already using it — the only question is whether you are. The gap between 2-finger and 3-finger in close-range fights is measurable, consistent, and entirely learnable.
The layout and sensitivity values in this guide are starting points, not magic presets. They’re designed to be as close to optimal as possible out of the box, but your hands, phone, and reflexes are different from everyone else’s. Use these as a base, test methodically, and adjust one thing at a time.
Related guides on FreefireNation: 👉 Free Fire Solo Rank Push — How to Reach Heroic 👉 FF Complete Guide — Everything in One Place 👉 Free Fire Tools
AWM vs M82B Free Fire — Konsa Sniper Better Hai?
AWM vs M82B Free Fire — Konsa Sniper Better Hai? (Hindi Mein Poori Baat) Free Fire mein ek…
![]()
Free Fire Solo Rank Push Kaise Kare
Free Fire Solo Rank Push Kaise Kare — Heroic Tak Pahunchne ka Sahi Tarika Ek baat seedhi poochh…
Free Fire Kaise Khele – Naye Players ke Liye Poori Guide
Free Fire Kaise Khele – Naye Players ke Liye Poori Guide Pehli baar Free Fire khola, phone haath…
Free Fire Mein Best Character Kaun Sa Hai 2026
Free Fire Mein Best Character Kaun Sa Hai 2026 — Complete Tier List (OB53 Updated) Game Version: OB53…
Free Fire Best Skill Combo in Hindi
Free Fire Best Skill Combo 2026 — Konsa Combination OP Hai? (Hindi Guide) Game Version: OB53 | Last…
Free Fire Best Sensitivity Settings 2026 — Har Phone Ke Liye Alag Guide (2GB se 8GB RAM Tak)…
FAQ (Featured Snippet Targets)
Q: What is the best sensitivity for 3 finger claw in Free Fire? A: A strong starting point without gyroscope: General 95, Red Dot 90, 2x Scope 80, 4x Scope 65, Sniper Scope 38, Free Look 65. With gyroscope, add Gyroscope at 25–30. Always test in Training Island before ranked and adjust by ±5 per session.
Q: How do I import a HUD code in Free Fire? A: Go to Settings → In Match tab → Custom HUD Presets → tap “Use Share Code” → paste the code. The layout updates instantly. Your sensitivity settings are not affected.
Q: How long does it take to get used to 3 finger claw in Free Fire? A: Most players see clear improvement by day 5–7. The first 2–3 days will feel worse than 2-finger — this is normal and expected. Commit to at least 7 days before switching back.
Q: Does 3 finger claw work on small phones? A: Yes, but button placement needs adjustment. On phones under 6″, move the left fire button further inward so your index finger can comfortably reach it. Reduce overall button sizes and bring button clusters closer together.
1 Discussion