Free Fire Bermuda Map: The Ultimate Guide to Dominating the Classic Battleground 2026
If you’ve ever played Free Fire, you’ve dropped into Bermuda. It’s the map that started it all — the original battleground where millions of players fought their very first battle royale match. From the chaotic streets of Pochinok to the sniper-friendly rooftops of Bimasakti Strip, Bermuda is more than just a map. It’s where legends are made.
But here’s the truth — most players don’t actually know Bermuda well enough. They land at the same spots, take the same routes, and wonder why they keep getting eliminated in the top 10.
This guide changes that.
I’ve spent thousands of hours on Bermuda across ranked and casual matches. In this guide, I’m breaking down every named location, the best landing spots based on your play style, loot distribution, rotation strategies, vehicle spawns, and advanced tips that most guides don’t cover.
Whether you’re a beginner trying to survive your first match or a ranked grinder pushing for Heroic, this is the only Bermuda guide you’ll ever need.
What Is the Bermuda Map in Free Fire?
Bermuda is the first and most iconic map in Garena Free Fire. Launched with the game itself, it remains the most played map in both casual and ranked modes globally.
Bermuda Quick Facts
| Detail | Information |
|---|---|
| Map Name | Bermuda |
| Map Size | Approximately 2km × 2km (compact) |
| Max Players | 50 players per match |
| Match Duration | ~12–15 minutes average |
| Named Locations | 16+ major locations |
| Terrain Type | Mixed – urban, rural, coastal, mountainous |
| Vehicles Available | Cars, motorcycles, monster trucks |
| Best For | Aggressive players, fast-paced gameplay |
| Variant | Bermuda Remastered (updated version) |
What makes Bermuda special compared to maps like Kalahari, Purgatory, or Alpine is its compact size. The smaller area means:
- Faster engagements – You’ll encounter enemies within the first minute
- Shorter rotations – You don’t need vehicles as desperately
- Intense final circles – End zones are tight and action-packed
- Higher kill potential – Great for players who love aggressive gameplay
<a id=”map-overview”></a>
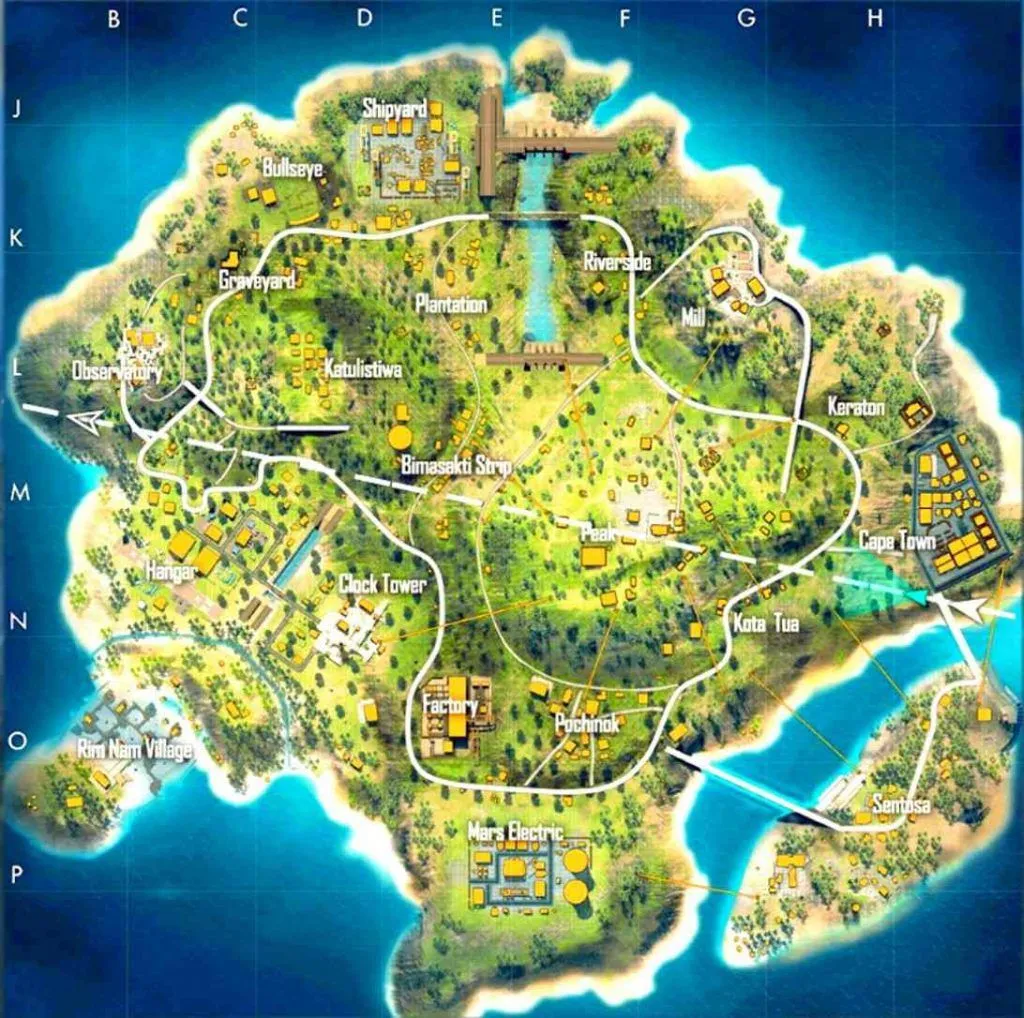
Bermuda Map Overview & Layout
Bermuda’s terrain is a mix of urban areas, open fields, hillsides, rivers, and coastal zones. Understanding the map’s geography is the first step to mastering it.
Geographic Breakdown
Northern Bermuda:
- Mostly elevated terrain with hills and ridges
- Locations: Katulistiwa, Sentosa, Mars Electric
- Good for: Players who prefer high-ground advantage and mid-game positioning
Central Bermuda:
- The heart of the map — dense urban areas and high player traffic
- Locations: Pochinok, Clock Tower, Bimasakti Strip
- Good for: Aggressive players looking for early fights and high kill counts
Southern Bermuda:
- Mix of coastal areas and open fields
- Locations: Shipyard, Cape Town, Rim Nam Village
- Good for: Players who prefer safer landings with decent loot
Eastern Bermuda:
- Industrial and military zones
- Locations: Hangar, Observatory, Mill
- Good for: Balanced players who want good loot without extreme heat
Western Bermuda:
- Riverside areas and scattered structures
- Locations: Riverside, Peak, Graveyard
- Good for: Strategic players who rotate into the zone from quieter areas
All Named Locations on Bermuda – Detailed Breakdown
Here’s a comprehensive breakdown of every major named location on the Bermuda map, including loot quality, danger level, and what to expect.
1. Pochinok
| Attribute | Rating |
|---|---|
| Loot Quality | ⭐⭐⭐⭐⭐ (Excellent) |
| Danger Level | 🔴 Very High |
| Player Traffic | Extremely High |
| Best For | Aggressive players, hot droppers |
Pochinok is the most popular landing spot on Bermuda. Located in the central part of the map, it’s a dense urban area with multi-story buildings, narrow streets, and rooftops.
Why players love Pochinok:
- Abundant high-tier loot spread across multiple buildings
- Close-quarter combat opportunities everywhere
- Central location means easy rotation to any zone
- Great for racking up kills early
What to watch out for:
- Expect 5–10 squads landing here in ranked matches
- Third-partying is extremely common
- Getting pinched between teams in narrow streets is a real risk
Pro tip: If you land Pochinok, grab the first weapon you see (even a pistol) and secure a building immediately. Clear floor by floor. Don’t loot in the open — you’ll get shot from a rooftop.
2. Clock Tower
| Attribute | Rating |
|---|---|
| Loot Quality | ⭐⭐⭐⭐ (Very Good) |
| Danger Level | 🔴 High |
| Player Traffic | High |
| Best For | Mid-range fighters, duo/squad players |
Clock Tower is another central landmark and one of the most recognizable locations in Free Fire. The tall clock tower structure provides a vantage point, and the surrounding buildings offer solid loot.
Key features:
- The tower itself offers a 360-degree view of the surroundings
- Multiple buildings with loot spread around the tower
- Very close to Pochinok — fights from Pochinok often spill into Clock Tower
Strategy: Use the clock tower for early scouting, but don’t camp there too long. It’s an obvious target, and enemies will throw grenades or push from multiple angles.
3. Bimasakti Strip
| Attribute | Rating |
|---|---|
| Loot Quality | ⭐⭐⭐⭐⭐ (Excellent) |
| Danger Level | 🔴 High |
| Player Traffic | High |
| Best For | Squad play, loot-focused players |
Bimasakti Strip is essentially Bermuda’s commercial district — a long stretch of buildings resembling a shopping area. It’s one of the best loot locations on the entire map.
Why it’s great:
- Dense loot concentration in a linear area
- Buildings on both sides provide cover and loot simultaneously
- Good position for rotating toward central or eastern zones
The risk:
- The linear layout makes it easy to get trapped if enemies hold both ends
- Rooftop snipers can dominate the strip
- Multiple squads often contest this area
Pro tip: When looting Bimasakti, always clear rooftops first. A single enemy with an M82B or Kar98k on the roof can wipe your entire squad.
4. Sentosa
| Attribute | Rating |
|---|---|
| Loot Quality | ⭐⭐⭐⭐ (Very Good) |
| Danger Level | 🟡 Medium |
| Player Traffic | Medium |
| Best For | Balanced players, ranked pushers |
Sentosa sits in the northern part of the map and offers a great balance between loot quality and safety. It doesn’t attract as many players as Pochinok or Bimasakti, making it ideal for players who want to loot up before engaging.
Highlights:
- Spread-out buildings with consistent loot
- Elevated terrain provides natural cover
- Fewer initial fights compared to central locations
- Good vehicle spawns nearby for rotation
Strategy: Land Sentosa, loot efficiently, and rotate toward the zone early. Use the northern hills for positioning advantage in mid-game.
5. Katulistiwa
| Attribute | Rating |
|---|---|
| Loot Quality | ⭐⭐⭐ (Good) |
| Danger Level | 🟢 Low-Medium |
| Player Traffic | Low-Medium |
| Best For | Beginners, safe landers |
Located in the far north, Katulistiwa is one of the quieter named locations. It offers decent loot without the chaos of central locations.
Best for:
- New players learning the game
- Players prioritizing survival over kills in ranked
- Solo players who want uncontested loot
Downside: If the zone pulls south, you’ll need a vehicle for rotation, and you might enter the mid-game at a disadvantage.
6. Hangar
| Attribute | Rating |
|---|---|
| Loot Quality | ⭐⭐⭐⭐ (Very Good) |
| Danger Level | 🟡 Medium-High |
| Player Traffic | Medium |
| Best For | Players who want military-grade loot |
Hangar is an aviation/military-themed location on the eastern side of the map. It features large open structures (hangars) with good loot, including frequent weapon upgrades and vests.
Key advantages:
- High chance of finding Level 3 vests and helmets
- Sniper rifles and ARs spawn frequently
- Open structures mean you can spot enemies early
Risk: The open layout of hangars means limited cover inside. If an enemy gets in while you’re looting, you’re exposed.
7. Shipyard
| Attribute | Rating |
|---|---|
| Loot Quality | ⭐⭐⭐⭐ (Very Good) |
| Danger Level | 🟡 Medium |
| Player Traffic | Medium |
| Best For | Squad players, strategic looters |
Shipyard is a coastal industrial area in the southern part of the map. It features containers, warehouses, and ship structures with high loot density.
Why experienced players love it:
- Container areas create excellent cover for firefights
- Multiple levels of loot (ground level + on top of containers)
- Relatively fewer players compared to its loot quality
- Easy rotation toward Cape Town or central areas
8. Mars Electric
| Attribute | Rating |
|---|---|
| Loot Quality | ⭐⭐⭐ (Good) |
| Danger Level | 🟢 Low |
| Player Traffic | Low |
| Best For | Safe play, solo ranked |
Mars Electric is a small industrial compound in the northern region. It’s often overlooked by most players, making it a hidden gem for those who want to loot peacefully.
Best strategy: Use Mars Electric as a starting point, loot the compound, then move to nearby locations (Sentosa or Katulistiwa) for additional loot before rotating.
9. Cape Town
| Attribute | Rating |
|---|---|
| Loot Quality | ⭐⭐⭐ (Good) |
| Danger Level | 🟢 Low-Medium |
| Player Traffic | Low |
| Best For | Edge-of-map rotators |
Cape Town occupies the southwestern corner of Bermuda. Its remote location means very few players land here, but the loot is sufficient for a solo player or even a duo.
Tip: Cape Town is great for a “loot and rotate” strategy, especially if the zone is pulling west or southwest.
10. Observatory
| Attribute | Rating |
|---|---|
| Loot Quality | ⭐⭐⭐ (Good) |
| Danger Level | 🟡 Medium |
| Player Traffic | Medium |
| Best For | Snipers, high-ground players |
The Observatory sits on elevated terrain in the eastern region. Its height advantage makes it a fantastic position for snipers and players who prefer long-range engagements.
Advantage: Great natural high ground for scouting and picking off rotating enemies during mid-game.
11. Mill
| Attribute | Rating |
|---|---|
| Loot Quality | ⭐⭐⭐ (Good) |
| Danger Level | 🟢 Low |
| Player Traffic | Low |
| Best For | Passive players |
Mill is a smaller location with moderate loot. It’s useful as a secondary loot stop rather than a primary landing spot.
12. Rim Nam Village
| Attribute | Rating |
|---|---|
| Loot Quality | ⭐⭐⭐ (Good) |
| Danger Level | 🟢 Low |
| Player Traffic | Low |
| Best For | Beginners, passive ranked players |
A quiet village area near the southern coast. Rim Nam Village offers scattered loot across small houses. Low risk, low reward — perfect for survival-focused gameplay.
13. Peak
| Attribute | Rating |
|---|---|
| Loot Quality | ⭐⭐⭐ (Good) |
| Danger Level | 🟡 Medium |
| Player Traffic | Low-Medium |
| Best For | Mid-game positioning |
Peak is located in the western hills and provides excellent elevation for mid-game and late-game positioning. Loot is moderate, but the terrain advantage is unmatched.
14. Riverside
| Attribute | Rating |
|---|---|
| Loot Quality | ⭐⭐⭐ (Good) |
| Danger Level | 🟢 Low |
| Player Traffic | Low |
| Best For | Safe rotations |
Riverside runs along the western river and offers scattered loot in small structures. It’s more of a transition zone than a landing spot — useful for picking up extra loot while rotating.
15. Graveyard
| Attribute | Rating |
|---|---|
| Loot Quality | ⭐⭐ (Moderate) |
| Danger Level | 🟢 Low |
| Player Traffic | Very Low |
| Best For | Emergency loot stops |
The Graveyard is a small, eerie location with limited loot. It’s rarely contested and serves as a quick stop during rotations.
16. Plantation
| Attribute | Rating |
|---|---|
| Loot Quality | ⭐⭐ (Moderate) |
| Danger Level | 🟢 Low |
| Player Traffic | Very Low |
| Best For | Passing through during rotations |
An open area with minimal structures. Not recommended as a primary landing spot, but useful for grabbing a weapon or supplies while moving through.
Best Landing Spots on Bermuda (Based on Play Style)
Not every player has the same approach. Here are the best landing spots categorized by how you like to play:
🔥 For Aggressive Players (Hot Drops)
| Rank | Location | Why |
|---|---|---|
| 1 | Pochinok | Highest player concentration, best for early kills |
| 2 | Bimasakti Strip | Dense loot + high combat opportunity |
| 3 | Clock Tower | Central fights, close to other hot zones |
Ideal for: Players pushing for kills, content creators, and those confident in their combat skills.
🛡️ For Balanced Players (Warm Drops)
| Rank | Location | Why |
|---|---|---|
| 1 | Sentosa | Great loot, medium traffic, good rotation options |
| 2 | Hangar | Military-grade loot, manageable fights |
| 3 | Shipyard | High loot density, strategic cover |
Ideal for: Ranked grinders who want good loot and controlled fights.
🧊 For Passive/Survival Players (Cold Drops)
| Rank | Location | Why |
|---|---|---|
| 1 | Katulistiwa | Remote, rarely contested |
| 2 | Cape Town | Edge of map, peaceful looting |
| 3 | Mars Electric | Small but uncontested loot compound |
Ideal for: Beginners, players focused on placement points in ranked, and solo queuers.
<a id=”high-loot”></a>
Top 5 High-Loot Locations on Bermuda
If your priority is getting fully geared as fast as possible, these locations consistently deliver the best loot:
1. Pochinok
- Multiple buildings = massive loot pool
- High chance of ARs, SMGs, shotguns, and utility
- Level 2–3 gear spawns common
2. Bimasakti Strip
- Linear loot path — efficient looting route
- Frequent weapon attachment spawns
- Good for squads — enough loot for all 4 players
3. Hangar
- Military-style loot tables
- Snipers (AWM, Kar98k, M82B) spawn here more often
- Level 3 vests and helmets are common
4. Shipyard
- Dense loot in container area
- Underrated compared to its actual loot quality
- Great for finding medkits and grenades in bulk
5. Sentosa
- Consistent high-quality loot
- Enough buildings to gear up a full squad
- Less contested than Pochinok
<a id=”hidden-spots”></a>

Top 5 Hidden & Underrated Spots on Bermuda
These locations are rarely discussed but can give you a serious advantage:
1. Unnamed Compounds Between Pochinok and Sentosa
There are several unmarked building clusters between major locations that often have untouched loot. While everyone fights in Pochinok, these compounds sit quietly with AR spawns and vests.
2. Hilltop Houses Near Observatory
Small houses on the hills east of Observatory often contain Level 2 gear and scoped weapons. The elevation also gives you a sniping position.
3. Containers Near Shipyard Outskirts
The edges of Shipyard have isolated container groups that most players skip. These can yield shotguns, SMGs, and throwables.
4. Bridge Areas Along the River
The bridges crossing Bermuda’s river have loot spawns underneath and on them. They’re also great ambush points during mid-game rotations.
5. Small Houses South of Clock Tower
These scattered houses are overlooked because players either go to Clock Tower or Pochinok. They offer decent loot with almost zero competition.
Vehicle Spawn Locations on Bermuda official maps
Vehicles are crucial for fast rotations, especially when the zone is far from your landing spot. Here are the most reliable vehicle spawn points:
| Vehicle Type | Common Spawn Locations |
|---|---|
| Sports Car | Roads near Bimasakti Strip, Pochinok outskirts, Sentosa |
| Motorcycle | Near Clock Tower, Observatory, Mill, road intersections |
| Monster Truck | Hangar area, Shipyard, northern roads |
| Amphibious Vehicle | Riverside, near bridges, coastal areas |
Pro tip: If you’re landing at a remote location (Katulistiwa, Cape Town), always have a vehicle exit plan. Identify the nearest vehicle spawn before you land. Being caught in the blue zone without a vehicle on Bermuda can cost you the match.
Zone Rotation Strategy for Bermuda
Rotation — moving from your current position to the safe zone — is where most matches are won or lost. Here’s how to master rotations on Bermuda:
Early Game (First 2 Zones)
- Priority: Loot up, don’t chase fights unless necessary
- Movement: Stay within your landing area
- Watch for: Players rotating through your area from adjacent locations
Mid Game (Zones 3–4)
This is the most dangerous phase. Multiple teams are rotating, and open fields become death traps.
- Use vehicles if the zone is far — running across open areas gets you killed
- Stick to the edges of the zone. Let central teams fight each other
- Use natural cover — hills, ridges, trees, rocks
- Listen for gunfire — third-party weakened teams, but be strategic about it
- Gloo walls are essential — carry 3–4 gloo walls minimum for emergency cover during rotations
Late Game (Zones 5+)
- Position > Loot. Stop looting. Focus on holding the best position
- High ground wins. If there’s a hill or building in the final zone, control it
- Save your utility (grenades, gloo walls, mushrooms) for the final 2–3 circles
- Play with your back to the zone edge — this reduces the angles enemies can attack from
- Don’t move unnecessarily. In tight final circles, every movement reveals your position
Rotation Routes to Remember
| Starting Location | Best Rotation Path |
|---|---|
| Katulistiwa | → Sentosa → Clock Tower area |
| Pochinok | → Clock Tower → wherever the zone pulls |
| Bimasakti Strip | → Pochinok side OR Hangar side (based on zone) |
| Shipyard | → Cape Town side OR Mill → central zone |
| Sentosa | → Pochinok OR Peak (based on zone) |
| Hangar | → Observatory → central zone |
| Cape Town | → Shipyard → northward rotation |
Bermuda Original vs Bermuda Remastered
Garena released Bermuda Remastered as an updated version of the classic map. Here’s how they compare:
| Feature | Bermuda (Original) | Bermuda Remastered |
|---|---|---|
| Layout | Classic design | Updated with new locations and visual upgrades |
| New Locations | N/A | Academy, Nurek Dam, Samurai Garden, Command Post |
| Graphics | Standard Free Fire visuals | Enhanced textures, lighting, and details |
| Removed Areas | N/A | Some original structures modified or replaced |
| Loot Distribution | Classic distribution | Rebalanced across new and old locations |
| Player Reception | Nostalgic favorite | Mixed — loved by some, missed by purists |
| Availability | Rotated in/out of playlists | Rotated in/out of playlists |
Notable New Locations in Bermuda Remastered
Academy:
- A large compound with a campus-like layout
- Excellent loot quality — comparable to Pochinok
- Multi-floor buildings with rooftop access
- High player traffic in ranked matches
Nurek Dam:
- A dam structure with surrounding buildings
- Great loot including snipers and ARs
- Elevated position with water features
- Medium player traffic
Samurai Garden:
- Japanese-themed aesthetic area
- Cultural structures with unique layouts
- Good loot, medium-low traffic
- Fun to explore and fight in
Command Post:
- Military-themed location
- Replaces/modifies parts of the original map
- High loot quality with tactical cover options
Which Version Should You Play?
| If You Prefer… | Play… |
|---|---|
| Nostalgia and familiarity | Bermuda Original |
| Fresh experience with new locations | Bermuda Remastered |
| Competitive ranked play | Whichever is in current rotation |
| Learning the game | Either — core layout is similar |
Pro Tips to Win on Bermuda
These tips come from hundreds of ranked matches and competitive experience. Apply them consistently, and you’ll see results:
1. Always Land With a Plan
Before the plane takes off, decide your landing spot based on the flight path. If the plane flies directly over Pochinok, expect maximum chaos there. Consider landing at a location slightly off the flight path for less competition.
2. Master the Drop
Fast dropping is a skill. Here’s how to land faster than your opponents:
- Open the map and mark your target location
- Jump from the plane when you’re at a 45-degree angle from the target
- Dive straight down (point your joystick forward and down) to maximize speed
- Pull up slightly just before reaching ground level to glide to your exact building
Landing 2–3 seconds faster than an opponent at the same location can mean the difference between getting a gun or getting eliminated.
3. Loot Efficiently
Don’t loot aimlessly. Follow a system:
- First priority: Any weapon (even a pistol)
- Second priority: Better weapon (AR or SMG) + ammo
- Third priority: Vest and helmet
- Fourth priority: Medkits, grenades, gloo walls
- Fifth priority: Weapon attachments, secondary weapon, mushrooms
Spend no more than 2–3 minutes on initial looting. After that, you should be combat-ready.
4. Use Bermuda’s Terrain
- Hills and ridges are your best friends. Always fight from high ground when possible
- Use buildings as cover, not as camping spots. Stay mobile within buildings
- Bridges are kill zones — cross them quickly or avoid them entirely
- Open fields are the most dangerous terrain. Use gloo walls or vehicles to cross them
5. Sound Is Your Radar
On Bermuda’s compact map, audio awareness is critical:
- Footsteps tell you exactly where enemies are approaching from
- Gunfire reveals ongoing fights you can third-party
- Vehicle engines alert you to incoming rotations
- Gloo wall placement sounds indicate a nearby enemy preparing for combat
Always play with headphones. The directional audio in Free Fire is surprisingly good.
6. Third-Party Intelligently
Bermuda’s small size means you’ll hear fights constantly. The temptation to rush every fight is real, but be strategic:
- Wait for the fight to end or for both teams to be visibly weakened
- Approach from a direction neither team expects
- Have your full squad ready before engaging — don’t trickle in one by one
- Grab loot from eliminated players quickly and reposition. Don’t loot in the open.
7. Gloo Wall Mastery
Gloo walls are arguably the most important utility item on Bermuda. On a map this compact with frequent engagements, gloo walls:
- Provide instant cover in open areas
- Enable aggressive pushes by blocking enemy sight lines
- Can be used as elevation (jump on top of them for height advantage)
- Block doorways and choke points to control enemy movement
Carry at least 3–5 gloo walls at all times. Practice placing them instantly during firefights.
8. Know When to Fight and When to Run
Not every engagement is worth taking. Ask yourself:
- Do I have enough HP and supplies to fight?
- Is the zone moving? Can I afford to spend time on this fight?
- Are there other teams nearby who might third-party me?
- Does my team have the positional advantage?
If the answer to any of these is unfavorable, disengage and reposition. Surviving is more important than one extra kill.
Common Mistakes to Avoid on Bermuda
❌ Landing Without Checking the Flight Path
The flight path determines where most players will land. Ignoring it leads to unexpected competition at your drop spot.
❌ Over-Looting
Spending 5+ minutes looting when you already have a full loadout. You’re wasting time and letting the zone shrink around you.
❌ Ignoring the Zone
Bermuda’s zone shrinks fast. Getting caught outside the zone — especially in later circles — is a common cause of death that’s 100% avoidable.
❌ Running Through Open Fields
On a compact map like Bermuda, someone is always watching. Use cover, vehicles, or gloo walls to cross open areas.
❌ Camping in One Building All Game
While holding a building can work in some situations, staying in one spot too long on Bermuda makes you predictable. Good players will nade you or push from multiple angles.
❌ Not Carrying Enough Gloo Walls
If you’re entering the top 10 without gloo walls, you’re putting yourself at a massive disadvantage. Always prioritize gloo walls in your inventory.
❌ Engaging Every Fight
Just because you hear gunfire doesn’t mean you should rush. Pick your fights wisely, especially in ranked.
Frequently Asked Questions (FAQ)
What is the best landing spot on the Bermuda map in Free Fire?
It depends on your play style. Pochinok is the best for aggressive players who want early kills. Sentosa is ideal for balanced players. Katulistiwa or Cape Town are best for players prioritizing survival.
How big is the Bermuda map?
Bermuda is approximately 2km × 2km, making it the most compact standard map in Free Fire. This small size leads to faster engagements and more action-packed matches.
What’s the difference between Bermuda and Bermuda Remastered?
Bermuda Remastered is an updated version featuring new locations (Academy, Nurek Dam, Samurai Garden), improved graphics, and rebalanced loot distribution while maintaining the core layout of the original map.
Where can I find the best loot on Bermuda?
The top loot locations are Pochinok, Bimasakti Strip, Hangar, Shipyard, and Sentosa. These locations consistently spawn high-tier weapons, Level 3 gear, and utility items.
Where do vehicles spawn on Bermuda?
Vehicles commonly spawn along main roads, near Bimasakti Strip, Pochinok outskirts, Sentosa, Hangar, and Shipyard. Motorcycles are found at smaller road intersections, while cars and trucks appear on larger roads.
Is Bermuda good for ranked matches?
Yes. Bermuda is one of the most popular ranked maps due to its compact size and fast-paced gameplay. For ranked play, we recommend landing at medium-traffic locations like Sentosa or Hangar, looting efficiently, and playing for zone positioning.
How many players play on the Bermuda map?
Each Bermuda match supports up to 50 players (compared to some maps that support more). This, combined with the small map size, creates a high-density, action-heavy experience.
What weapons are best for Bermuda?
Due to the map’s compact size and frequent close-to-mid range fights, the best weapon loadout for Bermuda is:
- Primary: AR (M4A1, AK, Woodpecker) or SMG (MP40, UMP)
- Secondary: Shotgun (M1887, M1014) for close range OR Sniper (Kar98k, AWM) for end-game
How do I rotate safely on Bermuda?
Stick to the zone edges, use vehicles for long rotations, carry gloo walls for emergency cover, avoid open fields, and use natural terrain (hills, buildings, ridges) as cover while moving.
Bermuda Map Cheat Sheet (Quick Reference)
| Category | Best Options |
|---|---|
| Best Hot Drop | Pochinok |
| Best Loot Spot | Bimasakti Strip |
| Safest Landing | Katulistiwa / Cape Town |
| Best for Snipers | Observatory / Peak |
| Best for Squads | Sentosa / Shipyard |
| Best Mid-Game Position | Clock Tower area / Hills near Peak |
| Best Late-Game Position | Any high ground inside the zone |
| Must-Carry Item | Gloo Walls (3–5 minimum) |
| Best Weapon Combo | AR + Shotgun or AR + Sniper |
Conclusion: Master Bermuda, Master Free Fire
Bermuda isn’t just a map — it’s the foundation of Free Fire’s identity. Every player who’s ever achieved Heroic rank, every content creator who’s gone viral with a clutch play, and every esports pro who’s lifted a trophy has spent countless hours mastering this 2×2 km battleground.
The difference between dying in the first minute and earning a Booyah isn’t luck — it’s knowledge, strategy, and practice. Now you have the knowledge. The strategy is laid out above. All that’s left is practice.
Drop into Bermuda. Apply what you’ve learned. And claim your Booyah.
1 Discussion