Landing consistent headshots in Free Fire can transform you from an average player into a feared opponent. Whether you’re pushing ranks in Clash Squad or dominating Battle Royale matches, your
Best Headshot Sensitivity Free Fire 2026
play a crucial role in determining how accurately you can aim for the head.
After extensive testing across different devices and countless hours of gameplay, we’ve compiled this comprehensive guide to help you find the best headshot sensitivity settings in Free Fire. This isn’t about copying random numbers—it’s about understanding what works and why.
Let’s dive deep into the world of sensitivity optimization and help you become a headshot machine.
Why Sensitivity Matters for Headshots {#why-sensitivity-matters}
Before we jump into specific numbers, let’s understand why sensitivity is so critical for landing headshots consistently.
In Free Fire, headshots deal significantly more damage than body shots. A well-placed headshot can eliminate an enemy in just one or two hits, even with weapons that would normally require multiple shots. This makes headshot accuracy one of the most valuable skills you can develop.
Your sensitivity settings determine:
- How fast your crosshair moves when you swipe or tilt your device
- How precisely you can track moving enemies
- How quickly you can flick to targets
- How smoothly you can make micro-adjustments
The wrong sensitivity can make your aim feel sluggish or uncontrollably fast. The right sensitivity creates a natural extension between your fingers and the crosshair on screen.
According to Garena Free Fire’s official esports statistics, top-tier players maintain headshot rates between 40-60%, largely due to optimized sensitivity settings combined with practice.
Understanding Free Fire Sensitivity Settings {#understanding-settings}
Free Fire offers several sensitivity categories that you need to configure. Understanding each one is essential before making adjustments.
General Sensitivity
This controls your overall look-around speed when not scoped in. It affects how quickly you can survey your surroundings and react to enemies appearing from different angles.
Red Dot Sensitivity
Controls your aim speed when using red dot sights, commonly attached to assault rifles like the M4A1 and AK47.
2X Scope Sensitivity
Affects aiming speed when using 2X magnification, popular for medium-range engagements.
4X Scope Sensitivity
Controls your aim when using 4X scopes, typically used with sniper rifles and DMRs for longer-range combat.
AWM Scope Sensitivity
Specifically designed for the AWM sniper rifle’s high-powered scope. This requires different settings due to the weapon’s extreme zoom level.
Free Look Sensitivity
Determines how fast you can look around while running without changing your movement direction.
Each of these settings needs individual attention because different combat scenarios require different levels of precision and speed.
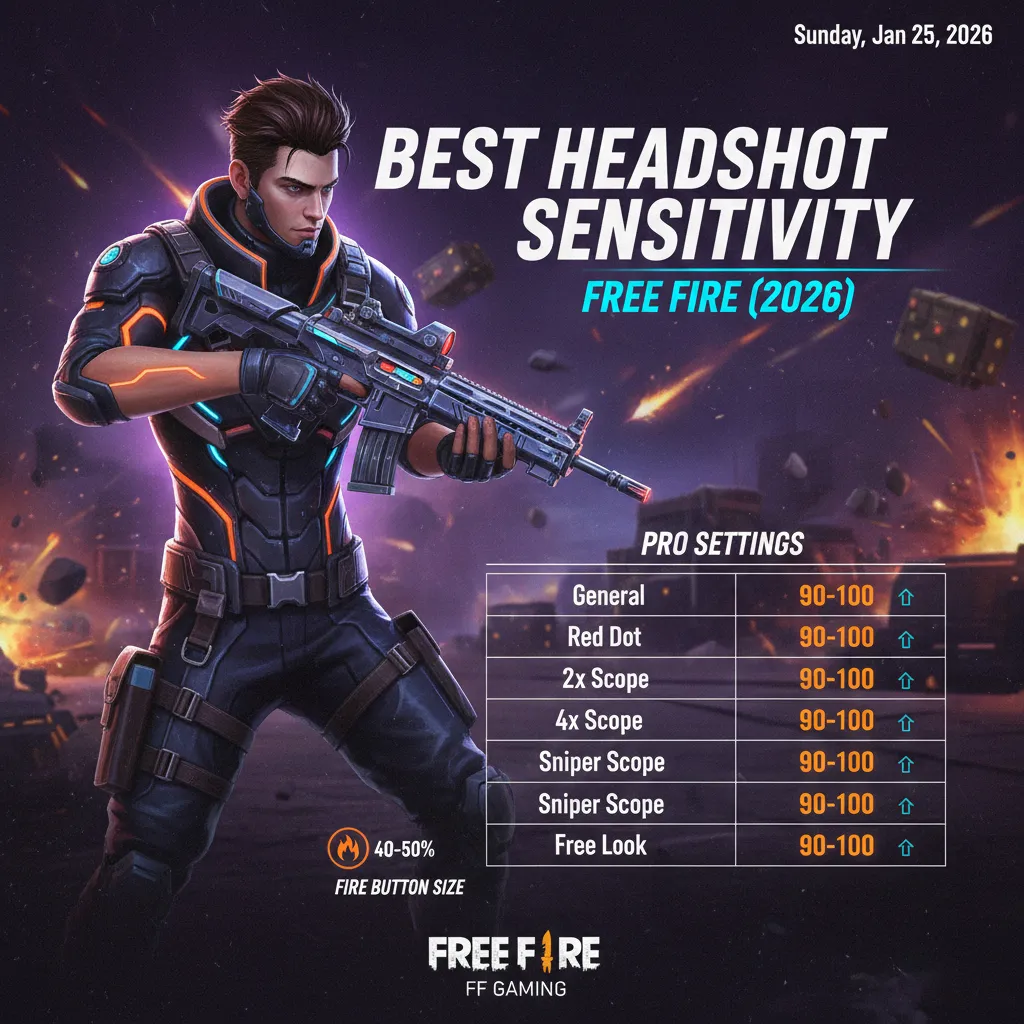
Best General Headshot Sensitivity Settings {#best-general-settings}

After testing numerous configurations and analyzing data from competitive players, here are the recommended sensitivity settings for consistent headshots:
Recommended Settings for Most Players
| Setting | Recommended Value |
|---|---|
| General | 90-100 |
| Red Dot | 75-85 |
| 2X Scope | 70-80 |
| 4X Scope | 55-65 |
| AWM Scope | 45-55 |
| Free Look | 70-80 |
Why These Numbers Work
These settings create a balance between speed and precision. Here’s the logic behind each:
General (90-100): You need fast general sensitivity to quickly locate enemies and spin around during surprise attacks. Since you’re not aiming precisely at this point, higher sensitivity helps with awareness.
Red Dot (75-85): This is where most close to medium-range gunfights happen. The slightly lower sensitivity compared to general allows for controlled tracking while still enabling quick target acquisition.
2X Scope (70-80): Medium-range encounters need stability. This range lets you track enemies smoothly while maintaining enough speed to adjust for their movement.
4X Scope (55-65): Long-range combat requires precision over speed. Lower sensitivity helps you make fine adjustments without overshooting your target.
AWM Scope (45-55): The AWM demands extreme precision since one shot can determine the outcome. Lower sensitivity minimizes over-correction.
Free Look (70-80): Comfortable speed for scanning surroundings without affecting your gameplay negatively.
For more tips on dominating gunfights, check out our Free Fire combat tips guide.
Device-Specific Sensitivity Recommendations {#device-specific}
Your device significantly impacts what sensitivity works best. A setting that feels perfect on one phone might feel completely wrong on another.

Create Nicknames for Free Fire
Free Fire Nickname Generator – with this tool you can Create Nicknames for Free Fire In the fast-paced…

Free fire invisible space copy paste (ㅤ)
Free Fire Invisible Space Generator (2026 Updated) – Get Blank Names That Work What is Free Fire Invisible…

Free Fire Account Age Checker
Free Fire Account Age Checker Free Fire is one of the most popular battle royale games in the…
Smartphone Users (5.5-6.5 inch screens)
Smaller screens require slightly higher sensitivity because you have less physical space to swipe. Your finger movements are naturally smaller, so the game needs to translate them into larger in-game movements.
Recommended Adjustments:
- Add 5-10 points to base recommendations
- Red Dot: 80-90
- 2X Scope: 75-85
Tablet Users (7+ inch screens)
Larger screens give you more physical space for swiping, allowing for lower sensitivity settings with greater control.
Recommended Adjustments:
- Subtract 5-10 points from base recommendations
- Red Dot: 65-75
- 2X Scope: 60-70
High Refresh Rate Devices (90Hz/120Hz)
If your device supports higher refresh rates and Free Fire runs smoothly at these rates, you may find that sensitivity feels slightly different. The smoother visual feedback can make movements feel faster.
Recommendation: Start with standard settings and make small adjustments based on feel.
Older/Budget Devices
Lower frame rates can make sensitivity feel inconsistent. If your device struggles with performance, consider:
- Slightly lower sensitivity to compensate for frame drops
- Reducing graphics settings to improve stability
- Testing sensitivity in training mode rather than ranked matches
The gaming experts at Android Authority have extensively covered how device performance affects mobile gaming—this directly applies to Free Fire sensitivity optimization.
Gyroscope Sensitivity for Headshots {#gyroscope-sensitivity}
The gyroscope feature is a game-changer for headshot accuracy. It uses your device’s motion sensors to help with aiming, adding another layer of control beyond just touch input.
Should You Use Gyroscope?
Many pro players use gyroscope because it offers:
- Faster micro-adjustments for headshots
- More natural aiming that mimics console/PC experiences
- Better recoil control when combined with touch
- Quicker reaction time in close-range fights
However, gyroscope isn’t for everyone. It has a learning curve and requires physical stability while playing.
Best Gyroscope Sensitivity Settings
| Setting | Gyroscope Value |
|---|---|
| General | 250-300 |
| Red Dot | 280-320 |
| 2X Scope | 260-300 |
| 4X Scope | 200-240 |
| AWM Scope | 150-180 |
Tips for Gyroscope Users
- Start lower than recommended and increase gradually
- Use “Scope On” mode initially—it activates gyroscope only when aiming
- Practice in training mode for at least a week before ranked
- Keep your arms stable by resting elbows on a surface
- Combine gyroscope with touch for optimal results
For detailed character ability pairings that complement aggressive headshot playstyles, visit our character guide section.
Pro Player Sensitivity Settings {#pro-player-settings}
Learning from professional Free Fire players provides valuable insights. These players have spent thousands of hours optimizing their settings.
Notable Pro Player Settings
Raistar (Indian Content Creator/Pro)

- Known for incredible headshot accuracy
- Uses higher sensitivity settings
- General: 100, Red Dot: 90, 2X: 85
B2K (Born2Kill)
- Famous for aggressive headshot gameplay
- Prefers balanced sensitivity
- General: 95, Red Dot: 85, 2X: 80
![]()
- One of the most popular Free Fire content creators
- Uses moderate sensitivity suitable for various playstyles
- General: 100, Red Dot: 80, 2X: 75
Important Note About Pro Settings
While these settings work for professional players, blindly copying them might not work for you. Pro players have:
- Different devices
- Different hand sizes and grip styles
- Years of muscle memory with their settings
- Different playstyles
Use pro settings as starting points rather than final solutions. Adjust based on your personal comfort and device.
Professional esports coverage sites like Liquipedia track competitive Free Fire scenes and player configurations—worth checking for updated pro settings.
How to Find Your Perfect Sensitivity {#find-perfect-sensitivity}
Finding your ideal sensitivity is a process that requires patience and systematic testing. Here’s a step-by-step approach:
Step 1: Start with Baseline Settings
Use the recommended settings mentioned earlier as your starting point. These work for most players and provide a solid foundation.
Step 2: Use Training Mode Effectively
Free Fire’s training mode is invaluable for sensitivity testing. Here’s how to use it:
- Enter training mode
- Pick up a weapon with the scope you want to test
- Practice shooting at both stationary and moving targets
- Focus on tracking targets smoothly
Step 3: The Target Tracking Test
Try to keep your crosshair on a moving target:
- If you’re consistently behind the target, increase sensitivity
- If you’re constantly ahead of the target, decrease sensitivity
- If you can track smoothly, you’re in the right range
Step 4: The Flick Shot Test
Practice quickly aiming at targets that appear suddenly:
- If you undershoot (stop before the target), increase sensitivity
- If you overshoot (go past the target), decrease sensitivity
Step 5: Make Small Adjustments
Never change sensitivity by more than 5 points at a time. Large jumps make it impossible to identify what works.
Step 6: Test in Real Matches
After finding comfortable settings in training, test them in actual matches. The pressure of real combat reveals whether your settings truly work.
Step 7: Give It Time
Your brain and muscles need time to adapt. Stick with new settings for at least 2-3 days before making more changes.
We have additional aiming resources available in our tips and tricks section.
Tips to Improve Headshot Accuracy {#improve-accuracy}
Sensitivity is just one piece of the puzzle. Here are additional strategies to improve your headshot rate:
1. Crosshair Placement
Always keep your crosshair at head level. This reduces the distance you need to adjust when an enemy appears. Practice walking around the map with your crosshair at the height where enemies’ heads would be.
2. Pre-Aiming Common Spots
Learn where enemies typically appear and pre-aim those spots. This gives you a significant advantage when someone actually shows up.
3. Master Drag Headshots
Drag headshots are essential in Free Fire. Practice the technique of quickly dragging your aim upward while firing. This creates a “flick” motion that lands headshots on moving targets.
4. Use the Right Weapons
Some weapons are better for headshots than others:
- M1887: Excellent for one-tap headshots at close range

- Desert Eagle: High headshot damage potential
- M82B: Devastating headshot power at range

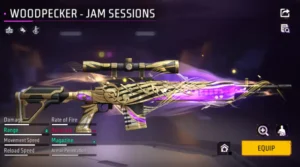
- Woodpecker: Built-in headshot damage bonus
5. Character Abilities
Certain characters complement headshot playstyles:
- Laura: Increases accuracy when scoped
- Rafael: Silent sniping for calculated headshots
- Maro: Bonus damage at distance
6. Warm Up Before Playing
Spend 5-10 minutes in training mode before jumping into ranked. This activates muscle memory and prepares your aim.
7. Stay Calm Under Pressure
Panic leads to wild aim. Practice staying calm during gunfights through controlled breathing and experience.
Common Sensitivity Mistakes to Avoid {#common-mistakes}
Many players sabotage their aim improvement by making these errors:
Mistake 1: Changing Settings Too Often
Every time you change sensitivity, your muscle memory resets. Constantly switching settings prevents your brain from developing consistent aiming patterns.
Solution: Commit to settings for at least one week before making adjustments.
Mistake 2: Copying Settings Without Understanding
Using a pro player’s exact settings without considering device differences and personal preferences rarely works.
Solution: Use pro settings as guidelines, then customize based on testing.
Mistake 3: Ignoring Device Limitations
If your phone has performance issues, even perfect sensitivity won’t help. Frame drops and lag affect aiming dramatically.
Solution: Optimize device performance first, then fine-tune sensitivity.
Mistake 4: Using Extremely High Sensitivity
Some players believe higher sensitivity equals faster kills. In reality, extremely high sensitivity makes precise aiming nearly impossible.
Solution: Find the balance where you can both react quickly AND aim precisely.
Mistake 5: Neglecting Scope-Specific Settings
Using the same sensitivity for all scopes ignores how different magnification levels require different control.
Solution: Configure each scope sensitivity individually based on its use case.
Mistake 6: Not Practicing Enough
No sensitivity setting magically creates headshot accuracy. Settings enable good aim—practice creates it.
Solution: Dedicate time to focused practice, not just casual playing.
Frequently Asked Questions {#faq}
What is the best sensitivity for Free Fire headshots on mobile?
The best sensitivity varies by device, but general recommendations are: General 90-100, Red Dot 75-85, 2X Scope 70-80, 4X Scope 55-65, and AWM Scope 45-55. Adjust based on your specific device and playstyle.
Should I use gyroscope for better headshots?
Gyroscope can significantly improve headshot accuracy once mastered. It allows for faster micro-adjustments and more natural aiming. However, it has a learning curve. Start with “Scope On” mode and practice in training before using it in ranked.
How long does it take to adjust to new sensitivity settings?
Most players need 3-7 days to fully adapt to new sensitivity settings. Your muscle memory requires time to recalibrate. Avoid making additional changes during this adjustment period.
Why do pro players use high sensitivity?
Pro players use higher sensitivity for faster reactions in competitive play. However, they’ve developed precise muscle memory over thousands of hours. Beginners should start with moderate sensitivity and increase gradually as their control improves.
Can sensitivity settings fix bad aim?
Sensitivity settings can optimize your aim but won’t fix fundamental aiming problems. Proper crosshair placement, practice, and game sense are equally important. Think of sensitivity as enabling your potential—you still need to develop the skill.
What’s the difference between DPI and in-game sensitivity?
DPI (Dots Per Inch) relates to your device’s touch sensitivity, which is usually fixed on mobile devices. In-game sensitivity works on top of your device’s base settings. On mobile, focus on in-game sensitivity since you can’t typically change device DPI.
How do I know if my sensitivity is too high or too low?
If you consistently overshoot targets (aim goes past them), your sensitivity is too high. If you consistently undershoot (aim falls short), it’s too low. Perfect sensitivity lets you stop your crosshair exactly where you intend.
Conclusion: Your Path to Headshot Mastery
Finding the best headshot sensitivity in Free Fire is a personal journey that combines recommended baselines with individual testing and consistent practice. The settings we’ve shared come from extensive testing and analysis of successful players, but ultimately, the perfect sensitivity is the one that feels natural to YOU.
Remember these key takeaways:
- Start with recommended settings as your baseline
- Test systematically in training mode
- Make small adjustments rather than dramatic changes
- Consider your specific device when configuring
- Give settings time to feel natural
- Practice consistently to build muscle memory
- Stay patient—improvement takes time
Headshot accuracy isn’t just about sensitivity—it’s the combination of good settings, proper technique, smart positioning, and dedicated practice. Use this guide as your foundation, put in the work, and watch your headshot rate climb.
Now get into Free Fire and start dominating with those crisp headshots!
What sensitivity settings work best for you? Share your configurations in the comments below, and let’s help each other improve!
Last Updated: 2026 | FreeFireNation.com
Related Articles You Might Enjoy:
1 Discussion